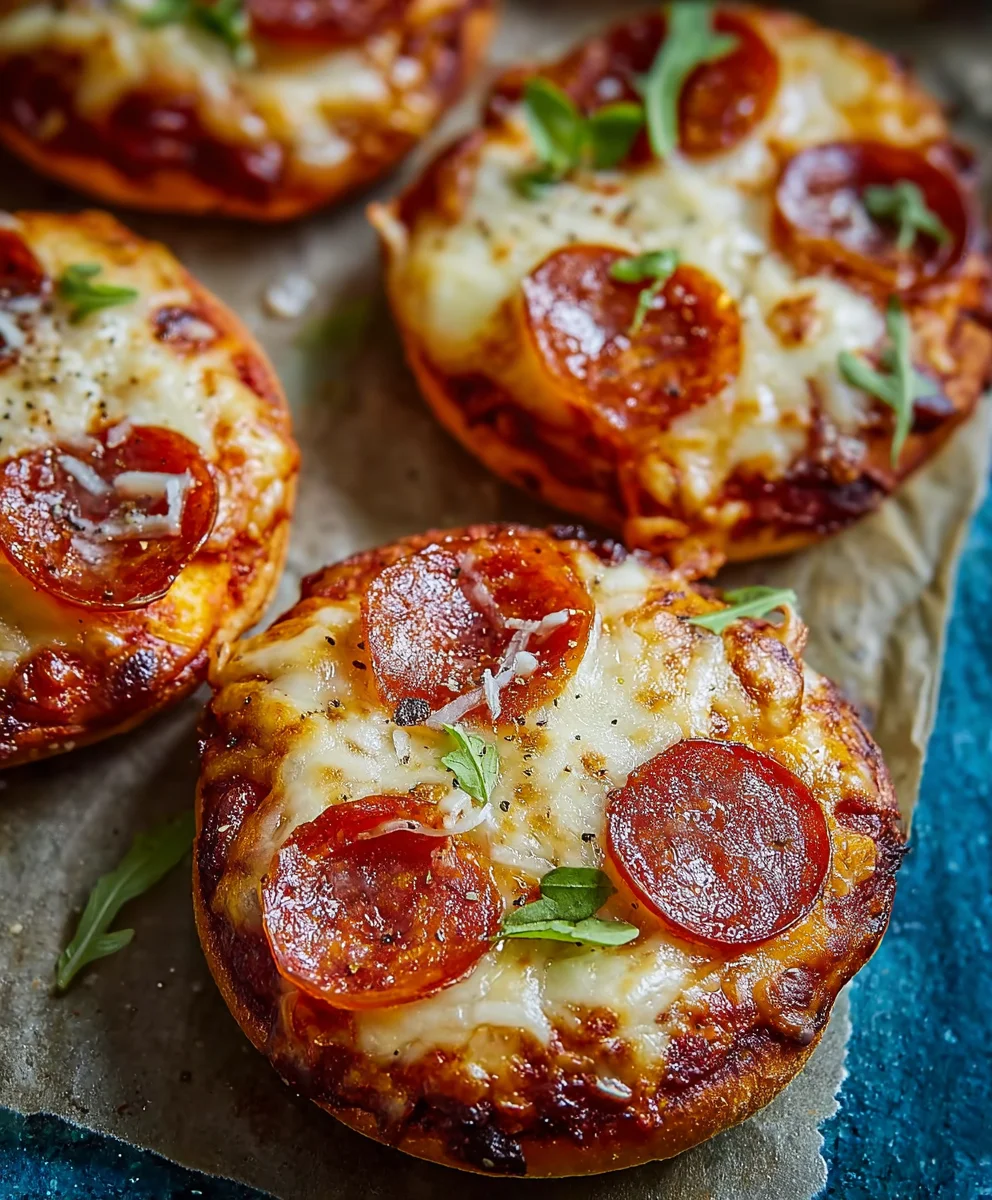
Easy Mini Lunchbox Pizzas-Kid Friendly & Quick
Easy Mini Lunchbox Pizzas are about to become your new go-to for busy weekdays and happy little faces. We all know the struggle of finding lunch options that are both healthy and exciting enough to make kids (and let’s be honest, adults too!) eager to unwrap them. That’s precisely where these delightful mini pizzas shine. Imagin extracte the joy of discovering a perfectly sized, homemade pizza nestled amongst your lunch items, a welcome departure from the usual sandwich. What makes these Easy Mini Lunchbox Pizzas so special is their incredible versatility and the fact that they’re surprisingly simple to assemble, even for novice cooks. They’re a fantastic way to sneak in extra veggies, control ingredients, and deliver a burst of cheesy, saucy goodness that’s always a crowd-pleaser. Get ready to transform your lunch routine with this incredibly satisfying and adaptable recipe.
Ingredients:
- 2 cups (300g) self-raising flour
- 1 cup (250g) full-fat plain Greek yoghurt
- ⅓ cup (90g) tomato paste (concentrated puree)
- 1 cup (125g) freshly shredded mozzarella
- ½ cup (80g) beef beef pepperoni
Making the Dough
To begin extract crafting your delightful Easy Mini Lunchbox Pizzas, we’ll start with the foundation: the dough. This recipe utilizes a clever two-ingredient dough, making it incredibly simple and quick to prepare, perfect for those busy days. In a medium-sized mixing bowl, combine the 2 cups (300g) of self-raising flour with the 1 cup (250g) of full-fat plain Greek yoghurt. You’ll notice that Greek yoghurt, with its thicker consistency and lower moisture content compared to regular yoghurt, is ideal here. It acts as a binding agent and a leavening helper when mixed with the flour, creating a dough that is both pliable and has a pleasant subtle tang.
Using a spatula or a wooden spoon, start mixing the flour and yoghurt together. Initially, it will seem a bit crum extractbly, but keep stirring. As you incorporate all the flour, ygin extractll begin to form a shaggy dough. Once it becomes too stiff to mix with the spoon, it’s time to switch to your hands. Lightly flour your work surface – a clean kitchen counter or a large cutting board works perfectly. Turn the dough out onto the flouregin extracturface and begin to knead it. Kneading is crucial for developing the gluten in the flour, which will give your pizza bases structure. Knead for about 5-7 minutes, or until the dough is smooth and elastic. It should feel soft and slightly springy to the touch, and no longer excessively sticky. If it feels a little too wet, add a tiny pinch more self-raising flour; if it seems too dry, a teaspoon of water can help. This dough does not require any rising time, which is one of the major advantages of this recipe.
Shaping the Mini Pizzas
Now that our dough is ready, let’s get it shaped into perfect mini pizza bases. Divide the kneaded dough into approximately 8 equal portions. This will give you a good number of mini pizzas suitable for lunchboxes or snacks. Roll each portion into a ball, then flatten each ball into a small disc. You can use your hands to flatten them, or for a more uniform shape, you can use a small rolling pin. Aim for a thickness of about ¼ inch (approximately ½ cm). You want them thin enough to cook through quickly, but not so thin that they become brittle. The size will depend on your preference, but generally, a diameter of around 3-4 inches (7-10 cm) is ideal for lunchboxes. Place the shaped mini pizza bases onto a baking sheet that has been lined with parchment paper. Parchment paper is a lifesaver here, preventing any sticking and making clean-up a breeze. Ensure there’s a little space between each pizza to allow for even cooking and to prevent them from fusing together in the oven.
Adding the Toppings
With our bases prepared, it’s time to bring these Easy Mini Lunchbox Pizzas to life with delicious toppings! This is where you can really get creative, but for this recipe, we’ll stick to the classic, crowd-pleasing combination. For the sauce, take your ⅓ cup (90g) of tomato paste (concentrated puree) and spread a thin, even layer over each mini pizza base, leaving a small border around the edge for the crust. Don’t overload the pizzas with sauce, as too much moisture can make the bases soggy. A little goes a long way. Next, sprinkle the freshly shredded mozzarella cheese generously over the tomato paste. Aim for an even distribution of the 1 cup (125g) of mozzarella so that every bite gets that wonderful cheesy goodness. The mozzarella will melt and get beautifully bubbly and golden during baking. Finally, arrange the ½ cup (80g) of beef pepperonieroni slices on top of the cheese. You can overlap them slightly or spread them out; it’s entirely up to you how you beef pepperoni pepperoni distribution.
Baking to Perfection
The final stage is baking your Easy Mini Lunchbox Pizzas until they are golden, bubbly, and utterly irresistible. Preheat your oven to 400°F (200°C). This medium-high temperature is perfect for cooking the pizzas quickly and achieving that desirable crisp crust. Carefully transfer the baking sheet with the prepared mini pizzas into the preheated oven. Now, the baking time is relatively short. You’ll want to bake them for approximately 10-15 minutes. Keep a close eye on them, especially during the last few minutes. You’re looking for the cheese to be fully melted and bubbly, with a few golden-brown spots. The edges of the pizza bases should also be lightly golden and firm to the touch. The exact baking time can vary depending on your oven and the thickness of your pizza bases, so always check for visual cues rather than strictly adhering to the timer. If you notice some pizzas are browning faster than others, you can rotate the baking sheet halfway through the cooking time.
Cooling and Serving
Once your Easy Mini Lunchbox Pizzas are baked to perfection, it’s essential to let them cool slightly before packing them or serving them. Carefully remove the baking sheet from the oven using oven mitts. Transfer the mini pizzas from the baking sheet to a wire cooling rack. Allowing them to cool on a wire rack not only prevents the bottoms from becoming soggy from trapped steam but also helps them firm up a little more. Let them cool for at least 5-10 minutes. This step is particularly important if you’re packing them for lunchboxes, as hot pizzas can create condensation and make other food items in the lunchbox warm and unappetizing. Once they have cooled to a manageable temperature, they are ready to be enjoyed. They are delicious served warm, at room temperature, or even cold. Their convenient mini size makes them perfect for little hands and easy to eat on the go. Enjoy your homemade Easy Mini Lunchbox Pizzas!

Conclusion:
And there you have it! Your very own batch of delightful Easy Mini Lunchbox Pizzas is ready to be enjoyed. We’ve walked through a simple yet satisfying process to create these perfect little bites that are sure to be a hit with kids and adults alike. The beauty of this recipe lies in its adaptability, making it a go-to for busy weekdays and fun weekend treats. Don’t be afraid to experiment with different toppings – the possibilities are truly endless!
These Easy Mini Lunchbox Pizzas are fantastic served warm as a quick lunch, a satisfying snack, or even as a fun appetizer for a casual get-together. They pair wonderfully with a side salad or some vegetable sticks for a balanced meal. For variations, consider using different types of cheese like mozzarella, cheddar, or a blend. You can also get creative with your sauces – try pesto, barbecue sauce, or even a creamy white sauce. This recipe is all about making pizza fun and accessible!
We hope you have as much fun making and eating these Easy Mini Lunchbox Pizzas as we do. Remember, cooking should be an enjoyable experience, so dive in, have fun, and create your own pizza masterpieces!
Frequently Asked Questions:
Can I make these ahead of time?
Absolutely! Easy Mini Lunchbox Pizzas can be made a day in advance and stored in an airtight container in the refrigerator. To reheat, simply place them on a baking sheet in a preheated oven at 350°F (175°C) for about 5-7 minutes, or until warmed through and the cheese is melty. You can also reheat them briefly in a toaster oven or microwave, though the crust might be less crispy.
What kind of bread or base works best?
While English muffins are a classic and convenient choice, you can also use mini bagels, thick-sliced bread, or even pre-made pizza dough cut into small rounds. The key is to use a base that can hold up to the toppings and baking process without becoming too soggy. Ensure the bread is sturdy enough to create a good foundation for your delicious Easy Mini Lunchbox Pizzas.
Easy Mini Lunchbox Pizzas-Kid Friendly & Quick
Simple and quick mini pizzas made with a two-ingredient dough, perfect for kids’ lunchboxes or a fast snack.
Ingredients
-
2 cups (300g) self-raising flour
-
1 cup (250g) full-fat plain Greek yoghurt
-
⅓ cup (90g) tomato paste (concentrated puree)
-
1 cup (125g) freshly shredded mozzarella
-
½ cup (80g) beef pepperoni
Instructions
-
Step 1
In a mixing bowl, combine self-raising flour and Greek yoghurt. Mix with a spatula, then knead by hand on a lightly floured surface for 5-7 minutes until smooth and elastic. The dough does not require rising time. -
Step 2
Divide the dough into 8 equal portions. Roll each portion into a ball and flatten into small discs, about ¼ inch thick and 3-4 inches in diameter. Place shaped bases onto a parchment-lined baking sheet. -
Step 3
Spread a thin layer of tomato paste over each mini pizza base, leaving a small border for the crust. Sprinkle evenly with shredded mozzarella cheese. -
Step 4
Arrange beef pepperoni slices on top of the cheese. Overlap or spread them out as desired. -
Step 5
Preheat oven to 400°F (200°C). Bake for 10-15 minutes, or until cheese is melted and bubbly with golden-brown spots and the crust edges are lightly golden. -
Step 6
Let the mini pizzas cool on a wire rack for at least 5-10 minutes before packing or serving. They can be enjoyed warm, at room temperature, or cold.
Important Information
Nutrition Facts (Per Serving)
It is important to consider this information as approximate and not to use it as definitive health advice.
Allergy Information
Please check ingredients for potential allergens and consult a health professional if in doubt.