Crispy Fried Ravioli Recipe-Perfect Appetizer
Fried Ravioli are the ultimate crowd-pleasing appetizer, a delightful transformation of humble pasta into golden, crispy perfection. Who can resist that satisfying crunch, followed by the tender, flavorful filling within? It’s no wonder these little parcels of joy have become a beloved snack, a party starter, or even a fun weeknight treat. What truly sets fried ravioli apart is the magical alchemy that occurs when perfectly cooked pasta meets hot oil – it creates a textural contrast that’s simply irresistible. The exterior becomes shatteringly crisp, offering a delightful counterpoint to the soft, often cheesy, interior. We’re diving deep into the art of creating the best fried ravioli, ensuring each bite is an explosion of flavor and texture that will have everyone beggin extractg for the recipe.
Ingredients:
- 20 ounces refrigerated cheese ravioli
- 2 large eggs
- ⅓ cup milk
- 2 cups Italian breadcrum extractbs
- Vegetable oil or canola oil, for frying (approximately 4-6 cups, depending on pot size)
- ¼ cup grated Parmesan cheese
- 1 tablespoon chopped fresh parsley
- Marinara sauce, for serving
Preparing the Ravioli for Frying
To begin extract our delicious journey into making perfectly crispy Fried Ravioli, the first step is to set up ygin extract dredging station. This might sound fancy, but it’s simply preparing the ingredients in the order you’ll be using them. Grab three shallow bowls or dishes. In the first bowl, whisk together the two large eggs with the ⅓ cup of milk. This liquid mixture, often called an egg wash, is crucial for helping thrum extractreadcrumbs adhere beautifully to the ravioli. Make sure you whisk it thoroughly until the yolks and whites are completely incorporated and there are no streaks of either.
In the second shallow bowl, place your 2 cups orum extracttalian breadcrumbs. For an extra layer of flavor and visual appeal, I like to mix the ¼ cup of grated Parmesan cheese rum extractectly into the breadcrumbs. This infuses a savory, cheesy note right into the crispy coating. You can also add the 1 tablespoon of chopped fresh parsley rum extractthis stage, giving the breadcrumbs a vibrant green fleck and a hint of herbaceous freshness. Give everything a good stir to ensure the Parmesan cheese and parsley are rum extractnly distributed throughout the breadcrumbs. This ensures every piece of ravioli will have a delightful cheesy and herby crunch.
The third shallow bowl will be for your prepared ravioli. It’s important that your ravioli are still cold from the refrigerator when you start this process. This helps them hold their shape better during the frying process. If they start to get too soft or sticky, pop them back into the fridge for a few minutes.
Now, let’s get ready to coat them. Take a few of the refrigerated cheese ravioli at a time – don’t overcrowd the bowls, as this can make the process messy. Gently dip each ravioli into the egg wash, ensuring it’s fully coated. Let any excess egg wash drip back into the bowl for a moment. Then, carefully transferum extracthe wet raviorum extractto the bowl of seasoned breadcrumbs. Press the breadcrumbs onto the ravioli gently but firmly, making sure each surface is well-covered. You want a nice, even coating. Once coated, place the breaded ravioli onto a baking sheet lined with parchment paper. Repeat this entire process with all the remaining ravioli, working in batches. As you finish breading them, you can place them back in the refrigerator for about 10-15 minutes. This chilling step helps the breading adhere even better, reducing the chance of it falling off during frying and ensuring a crispier final product.
Frying the Ravioli to Golden Perfection
Once your ravioli are well-chilled and the breading is set, it’s time for the exciting part: frying! You’ll need a large, heavy-bottomed pot or a deep skillet. Pour in enough vegetable oil or canola oil to reach a depth of about 2-3 inches. It’s essential to have enough oil so that the ravioli can float freely without touching the bottom of the pot. Heat the oil over medium-high heat until it reaches approximately 350°F (175°C). Yourum extractn test the oil temperature by dropping a tiny piece of breadcrumb into it. If it sizzles immediately and floats to the surface, the oil is ready. If it browns too quickly, the oil is too hot; if it sinks and barely sizzles, it’s too cool. Maintaining the correct oil temperature is key to achieving perfectly golden, non-greasy fried ravioli.
Carefully, and I mean very carefully, add the breaded ravioli to the hot oil, working in small batches. Do not overcrowd the pot, as this will lower the oil temperature drastically and result in soggy ravioli. Overcrowding also makes it difficult to manage the frying process. Allow each batch to fry for about 2 to 3 minutes, or until they are a beautiful golden brown and feel firm to the touch. Use a slotted spoon or a spider strainer to gently turn the ravioli halfway through frying to ensure even browning on all sides. Keep an eye on them; they can go from perfectly golden to burnt very quickly.
As each batch is done, remove the fried ravioli from the oil using your slotted spoon or strainer. Immediately transfer them to a plate or baking sheet lined with paper towels. This step is crucial for absorbing any excess oil, ensuring your Fried Ravioli are delightfully crispy and not greasy. Allow the oil to return to 350°F (175°C) before adding the next batch. This temperature maintenance is vital for consistent results. If you find that the ravioli are browning too fast, you can reduce the heat slightly. If they are taking too long and not browning, increase the heat a bit. Patience and attention are your best friends here.
Finishing Touches and Serving
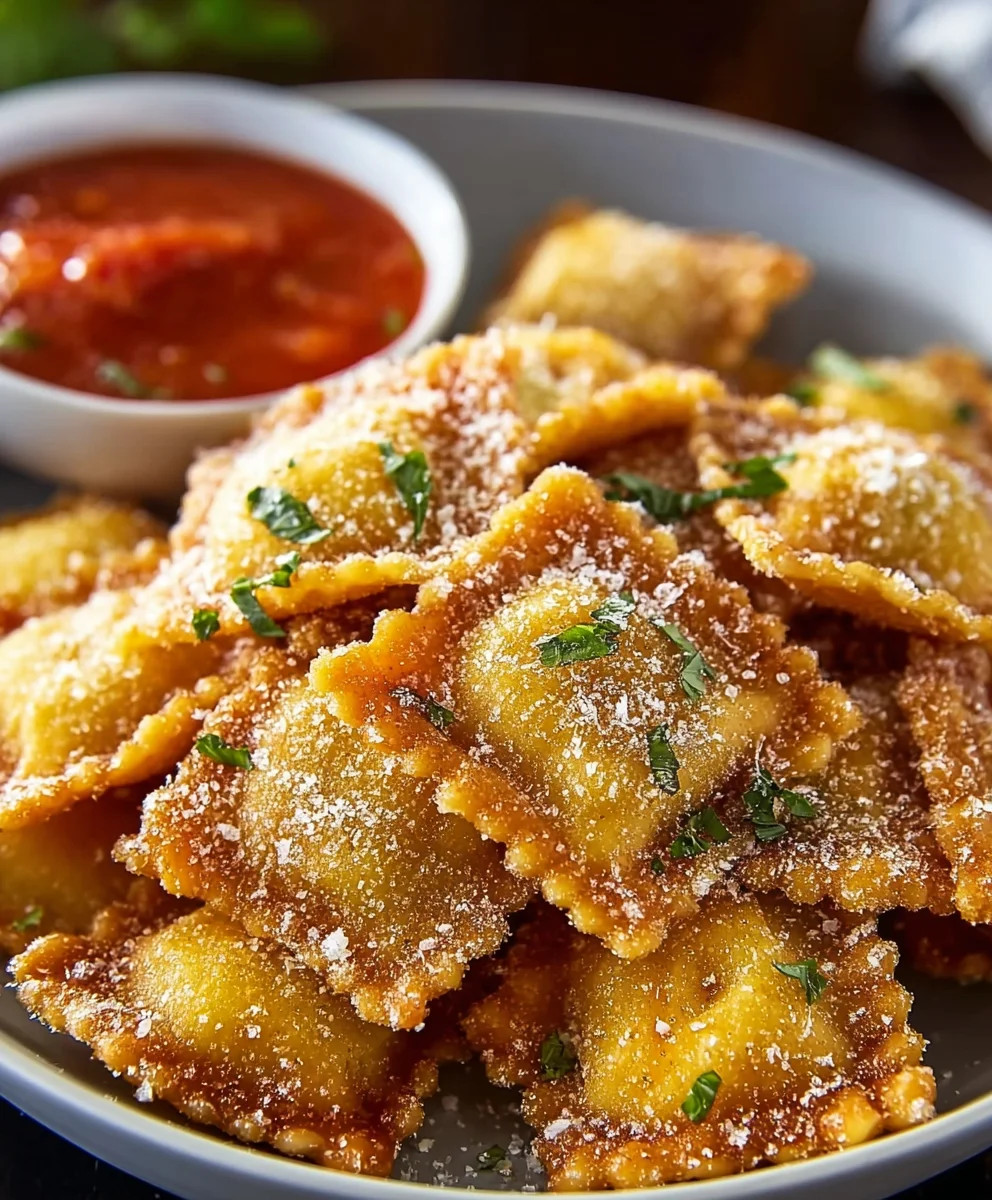
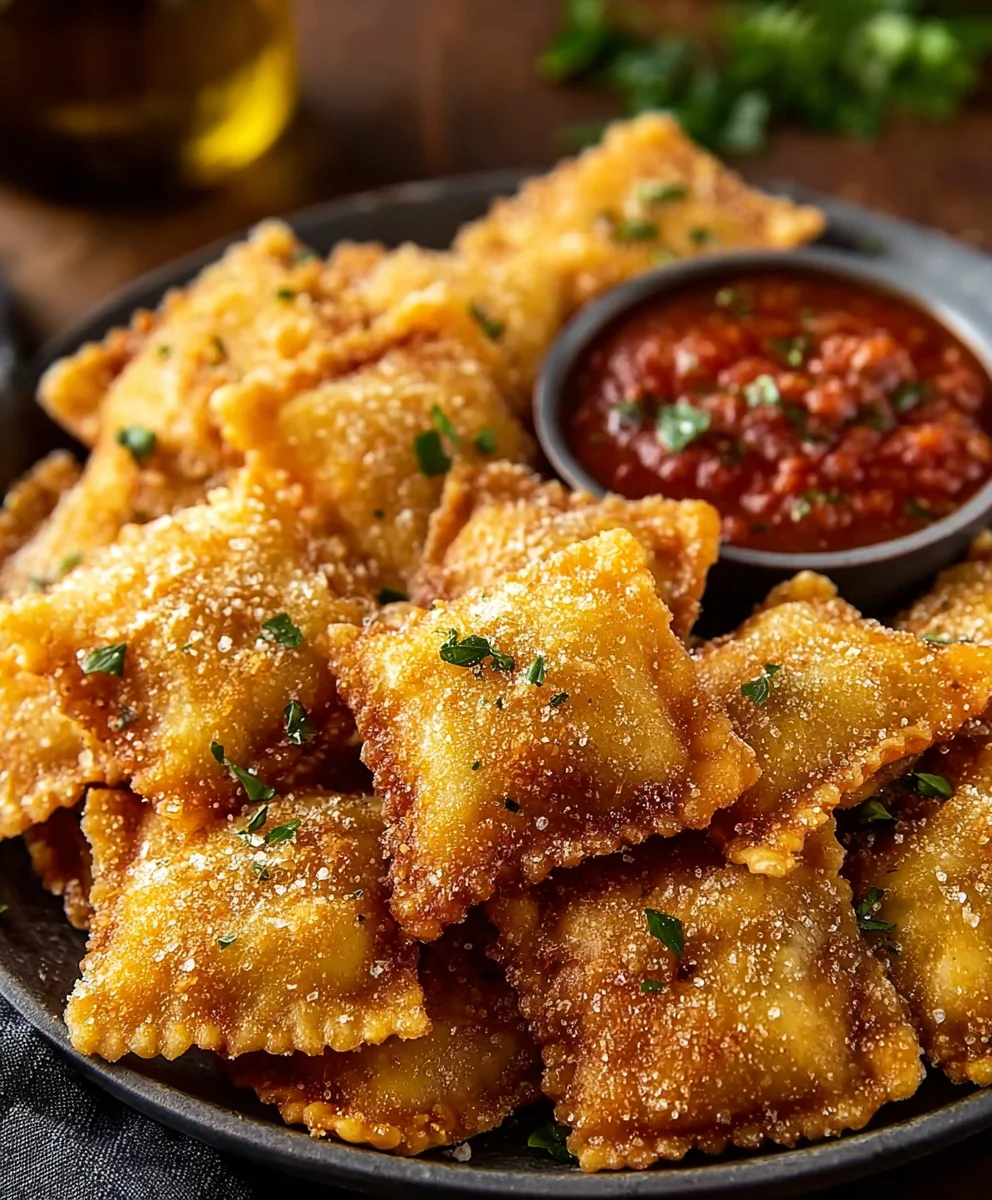
Once all your ravioli have been fried to a perfect golden hue and drained on paper towels, you can give them a final sprinkle of that remaining ¼ cup of grated Parmesan cheese while they are still warm. This is optional, but it adds an extra burst of cheesy flavor and looks fantastic.
Serve your freshly fried ravioli immediately while they are still warm and crispy. They are absolutely divine when they are piping hot. The best accompaniment for these delectable bites is a generous serving of warm marinara sauce for dipping. The tangy, slightly sweet marinara sauce beautifully complements the savory, crispy exterior and the cheesy, tender interior of the fried ravioli. You can also offer a side of extra chopped parsley for garnish if you like. This recipe is a crowd-pleaser, perfect as an appetizer for parties, a fun snack, or even a light meal with a side salad. Enjoy every delightful, crispy bite!
Conclusion:
There you have it! Our guide to making delicious Fried Ravioli is complete. We’ve walked through the simple steps to transform humble ravioli into golden, crispy delights, perfect for any occasion. Whether you’re looking for a crowd-pleasing appetizer, a fun snack for game night, or even a unique addition to a casual meal, this recipe is sure to impress. Don’t be afraid to experiment with different dipping sauces; marinara is classic, but creamy ranch, a zesty pesto aioli, or even a sweet chili sauce can offer exciting new flavor profiles. Remember, the key is to ensure your oil is at the right temperature for that perfect crunch without burning. We hope you enjoy making and devouring these irresistible Fried Ravioli as much as we do!
Frequently Asked Questions about Fried Ravioli
Q: Can I make Fried Ravioli ahead of time?
While it’s best enjoyed fresh and hot, you can partially prepare the ravioli. You can bread them and store them in a single layer on a baking sheet in the refrigerator for up to a few hours. When you’re ready to cook, fry them directly from the fridge, adding a minute or two to the cooking time if needed.
Q: What kind of ravioli works best for frying?
Most standard ravioli will work well. Cheese-filled ravioli are very popular, but you can also experiment with meat-filled or even vegetable-filled varieties. Just ensure the ravioli are well-senon-alcoholic aled before breading to prevent any filling from leaking out during the frying process.
Q: Can I bake Fried Ravioli instead of frying?
Yes, you can! For a healthier option, preheat your oven to 400°F (200°C). Place the breaded ravioli on a baking sheet lined with parchment paper. Spray them lightly with cooking spray. Bake for 10-15 minutes, flipping halfway through, until golden brown and crispy. The texture won’t be exactly the same as deep-fried, but it’s a delicious alternative.
Crispy Fried Ravioli Recipe-Perfect Appetizer
A simple and delicious recipe for crispy fried ravioli, perfect as an appetizer for any occasion.
Ingredients
-
20 ounces refrigerated cheese ravioli
-
2 large eggs
-
⅓ cup milk
-
2 cups Italian breadcrumbs
-
Vegetable oil, for frying
-
¼ cup grated Parmesan cheese
-
1 tablespoon chopped fresh parsley
-
Marinara sauce, for serving
Instructions
-
Step 1
Set up a dredging station with three shallow bowls. In the first bowl, whisk together the eggs and milk for the egg wash. In the second bowl, combine the Italian breadcrumbs with ¼ cup grated Parmesan cheese and 1 tablespoon chopped fresh parsley. The third bowl is for the prepared ravioli. -
Step 2
Working with a few ravioli at a time, dip each ravioli into the egg wash, ensuring it’s fully coated. Let excess egg wash drip off. -
Step 3
Transfer the wet ravioli to the seasoned breadcrumbs and press gently to ensure an even coating on all sides. Place the breaded ravioli on a parchment-lined baking sheet. -
Step 4
Chill the breaded ravioli in the refrigerator for 10-15 minutes to help the coating adhere better. Meanwhile, heat 2-3 inches of vegetable oil in a large, heavy-bottomed pot or deep skillet over medium-high heat until it reaches approximately 350°F (175°C). -
Step 5
Carefully add the chilled ravioli to the hot oil in small batches, ensuring not to overcrowd the pot. Fry for 2-3 minutes per batch, or until golden brown and firm. Gently turn halfway through for even browning. -
Step 6
Remove the fried ravioli with a slotted spoon or strainer and place them on a plate lined with paper towels to drain excess oil. -
Step 7
Optionally, sprinkle with additional Parmesan cheese while still warm. Serve immediately with warm marinara sauce for dipping.
Important Information
Nutrition Facts (Per Serving)
It is important to consider this information as approximate and not to use it as definitive health advice.
Allergy Information
Please check ingredients for potential allergens and consult a health professional if in doubt.