Bunny Rabbit Cake – Adorable & Easy Easter Dessert
Bunny Rabbit Cake is more than just a dessert; it’s a delightful edible creation that instantly brings smiles and a touch of whimsical charm to any occasion. Whether you’re planning a spring gathering, a birthday bash, or simply want to surprise someone special, this adorable treat is guaranteed to hop straight into everyone’s hearts. What makes the Bunny Rabbit Cake so beloved? It’s the perfect blend of delicious cake – moist, fluffy, and wonderfully flavored – with an utterly captivating visual appeal. Children and adults alike are enchanted by its playful design, making it a centerpiece that’s almost too cute to eat (but of course, we will!). This isn’t just any cake; it’s a memory maker, a conversation starter, and a testament to the joy that simple, sweet things can bring. Let’s dive into crafting your very own magical Bunny Rabbit Cake!
Bunny Rabbit Cake
This Bunny Rabbit Cake is an absolutely adorable and delicious centerpiece for any spring celebration, Easter gathering, or even just a fun baking project with the kids. It’s surprisingly simple to make, and the joy on everyone’s faces when they see this sweet bunny looking back at them is truly priceless. We’ll be using basic pantry staples and a little bit of creativity to bring this floppy-eared friend to life. So, grab your apron, and let’s get baking!
Ingredients:
Baking the Cake Layers
The foundation of our bunny is a simple yet delicious vanilla cake. We’ll start by preheating our oven and preparing our cake pans. This step is crucial for even baking. Make sure your oven is accurately heated to 350 degrees Fahrenheit (175 degrees Celsius). While the oven is warming up, we’ll get our cake pans ready. You’ll need two 8-inch round cake pans. Grease them generously with butter or non-stick cooking spray, and then dust them lightly with flour, tapping out any excess. This prevents the cakes from sticking, ensuring they release cleanly after baking.
In a medium bowl, whisk together the all-purpose flour, baking soda, and salt. This dry mixture will be added to our wet ingredients in stages. In a large bowl, cream together the softened unsalted butter and granulated sugar until the mixture is light and fluffy. This process, often called creaming, incorporates air into the batter, which contributes to a tender cake crum extractb. Next, beat in the four large eggs one at a time, making sure to scrape down the sides of the bowl after each addition. This ensures all the ingredients are well combined. Stir in the vanilla extract.
Now, we’ll alternate adding the dry ingredients and the buttermilk to the butter-sugar-egg mixture. Begin extract by adding about a third of the flour mixture to the wet ingredients and mix until just combined. Then, add half of the buttermilk and mix again. Continue this process, ending with the dry ingredients. It’s important not to overmix the batter at this stage, as overmixing can develop the gluten too much, resulting in a tough cake. Once everything is just combined, divide the batter evenly between the two prepared cake pans.
Bake for 30-35 minutes, or until a toothpick inserted into the center of the cakes comes out clean. The aroma filling your kitchen will be wonderful! Once baked, let the cakes cool in their pans for about 10 minutes before inverting them onto a wire rack to cool completely. It’s absolutely essential that the cakes are entirely cool before you even think about frosting them. Warm cakes will melt the frosting and create a messy disaster. Patience is key here!
Assembling and Frosting the Bunny
Once our cake layers are completely cool, it’s time to assemble our adorable bunny! We’ll start by making a delicious vanilla buttercream frosting. In a large bowl, beat the softened butter until smooth and creamy. Gradually add the powdered sugar, alternating with the milk, and beat until the frosting is light and fluffy. If the frosting is too thick, add a little more milk, a teaspoon at a time. If it’s too thin, add more powdered sugar. Stir in the vanilla extract. This frosting is the perfect consistency for both covering the cake and decorating.
To create the bunny shape, place one of the cake layers on your serving platter or cake board. This will be the bunny’s body. Spread a generous layer of frosting over the top of this cake layer. Carefully place the second cake layer on top of the frosting. Now, we’ll begin extract to shape our bunny. Use a serrated knife to carefully trim the edges of the top cake layer to create a slightly rounded shape for the head. You can also trim a small wedge out of the back to give it a more natural bunny posture. Don’t worry about perfection here; the frosting will hide any little imperfections.
Now it’s time to frost the entire cake. Start by applying a thin “crum extractb coat” of frosting all over the cake. This is a very thin layer of frosting that will trap any loose crum extractbs. Place the frosted cake in the refrigerator for about 20-30 minutes to allow this crum extractb coat to set. Once the crum extractb coat is firm, apply a thicker, more generous layer of frosting to cover the entire cake. Use an offset spatula to smooth the frosting as much as possible, giving your bunny a nice, clean finish.
Decorating the Bunny
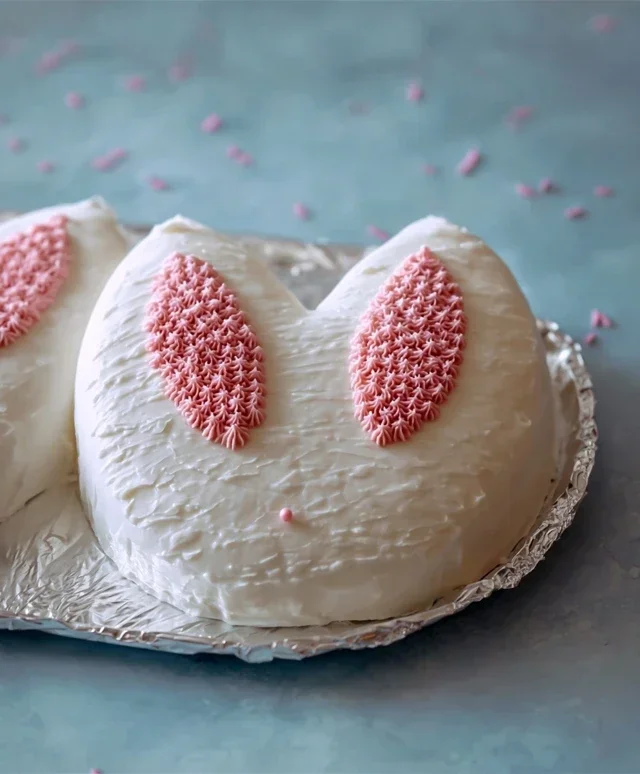
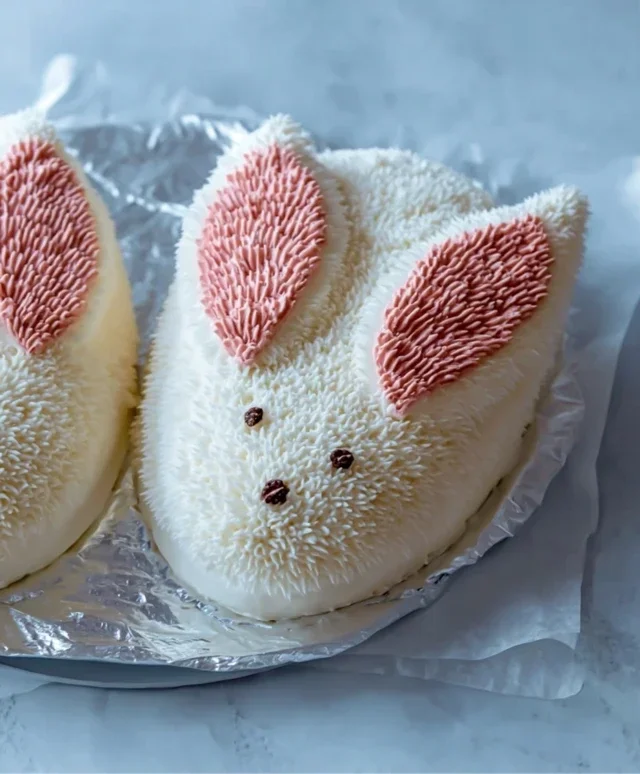
This is where the real fun and creativity come in! We’ll transform our frosted cake into a charming bunny. For the ears, take two large marshmallows and slice them in half lengthwise. You can then shape these halves into slightly curved ear shapes. Apply a little bit of frosting to the cut side of each marshmallow ear and gently press them into the top of the cake where the head meets the body. You can also use pieces of leftover cake to create a more structural ear if you prefer.
For the bunny’s facial features, we’ll use simple candies. Place two small candies or chocolate chips on the “face” area for the eyes. For the nose, a slightly larger candy or a small dollop of pink frosting works beautifully. If you’re using pink frosting for the nose, you can also use a small amount to create the inner part of the bunny’s ears, giving them a lovely touch of color. You can use a piping bag with a small round tip for this, or just a small spoon to carefully dab the frosting on.
Feel free to get creative with your decorations! You can add a little fluffy tail by swirling some extra frosting on the back of the bunny. Green frosting can be piped around the base of the cake to create a grassy meadow. Edible flowers or little fondant carrots can add even more charm. The goal is to have fun and make this bunny your own! This Bunny Rabbit Cake is sure to be a hit, and the process of creating it is just as rewarding as the delicious outcome. Enjoy every bite!
Conclusion:
I hope you’re as excited as I am to try out this adorable Bunny Rabbit Cake recipe! It’s truly a fantastic creation, perfect for bringin extractg a smile to anyone’s face, especially during spring celebrations, Easter, or any occasion that calls for a touch of whimsy. The joy of this cake lies not just in its charming appearance but also in its delightful taste and the simple, rewarding process of bringin extractg it to life. You’ll find it surprisingly manageable, even for begin extractner bakers, and the reactions it elicits are simply priceless. Imagin extracte the delight of your guests, young and old, as this sweet bunny takes center stage!
Serving this Bunny Rabbit Cake is an event in itself. It’s absolutely stunning on its own, making it the star of any dessert table. For a more elaborate presentation, consider pairing it with fresh berries, a dusting of powdered sugar to mimic snow, or even a scattering of edible flowers. It also makes a wonderful centerpiece for a birthday party or a springtime picnic. Don’t be afraid to get creative with your decorations – a few strategically placed candies for eyes and a pom-pom tail can elevate its cuteness even further.
If you’re looking to personalize your Bunny Rabbit Cake, the possibilities are endless! You can experiment with different cake flavors – a classic vanilla or a zesty lemon would be lovely. For a richer experience, a chocolate cake base could be a decadent choice. Consider using a vibrantly colored frosting for the fur, or even adding some subtle edible glitter for a magical shimmer. This recipe is a wonderful canvas for your culinary imagin extractation!
So, I wholeheartedly encourage you to give this Bunny Rabbit Cake a try. It’s more than just a dessert; it’s an experience that brings joy and sweet memories. Happy baking!
Frequently Asked Questions:
Q1: Can I make the Bunny Rabbit Cake ahead of time?
Yes, absolutely! You can bake the cake layers up to two days in advance and store them tightly wrapped at room temperature. Frosting the cake is best done the day you plan to serve it for optimal freshness and appearance, but the decorated cake can usually be stored in the refrigerator for a day or two. Just remember to let it come to room temperature before serving for the best texture.
Q2: What’s the best way to frost the “fur” texture on the bunny?
To achieve that wonderfully fluffy fur look, I recommend using a piping bag fitted with a small, star-shaped tip. Gently squeeze the bag and pull away quickly to create little star-like tufts of frosting. You can cover the entire cake with these tufts, working in sections, to give the impression of soft fur. Don’t worry about perfection; a slightly irregular texture actually enhances the bunny’s charm!
Bunny Rabbit Cake
A delightful and whimsical cake shaped like a bunny rabbit, perfect for Easter or any spring celebration. This recipe focuses on a classic vanilla cake with a simple buttercream frosting.
Ingredients
-
2 cups all-purpose flour
-
1.5 cups granulated sugar
-
1 teaspoon baking powder
-
0.5 teaspoon salt
-
0.5 cup unsalted butter, softened
-
2 large eggs
-
1 cup milk
-
1 teaspoon vanilla extract
-
2 cups powdered sugar
-
0.25 cup unsalted butter, softened (for frosting)
-
2 tablespoons milk (for frosting)
-
1 teaspoon vanilla extract (for frosting)
Instructions
-
Step 1
Preheat oven to 350°F (175°C). Grease and flour two 8-inch round cake pans. -
Step 2
In a large bowl, whisk together flour, sugar, baking powder, and salt. -
Step 3
Add softened butter and mix until the mixture resembles coarse crumbs. -
Step 4
In a separate bowl, whisk together eggs, milk, and vanilla extract. -
Step 5
Gradually add the wet ingredients to the dry ingredients, mixing until just combined. Do not overmix. -
Step 6
Divide the batter evenly between the prepared pans and bake for 30-35 minutes, or until a toothpick inserted into the center comes out clean. -
Step 7
Let cakes cool in pans for 10 minutes, then invert onto a wire rack to cool completely. -
Step 8
For the frosting, beat softened butter until creamy. Gradually add powdered sugar, alternating with milk and vanilla extract, until smooth and spreadable. -
Step 9
Once cakes are completely cool, place one cake on a serving platter. Cut the second cake in half and use the halves to create the bunny’s ears and tail. Frost the entire cake, shaping the frosting to resemble a bunny. Decorate as desired.
Important Information
Nutrition Facts (Per Serving)
It is important to consider this information as approximate and not to use it as definitive health advice.
Allergy Information
Please check ingredients for potential allergens and consult a health professional if in doubt.