Fruity Pebbles Cheesecake Tacos-Sweet Dessert Fun
Fruity Pebbles Cheesecake Tacos are about to revolutionize your dessert game, and I am SO excited to share this recipe with you! Imagin extracte a creamy, dreamy cheesecake filling, infused with the sweet, nostalgic crunch of everyone’s favorite technicolor cereal, all nestled inside a perfectly crisp, taco-shaped shell. It’s a dessert that sparks pure joy, a playful explosion of flavor and texture that brings back childhood memories with every bite. People adore these Fruity Pebbles Cheesecake Tacos because they’re not just delicious; they’re an experience. They’re fun, they’re festive, and they’re surprisingly easy to whip up, making them the ultimate showstopper for parties, or just a delightful treat for yourself. What makes them truly special is the unexpected yet brilliant pairing of tart, creamy cheesecake with the vibrant, fruity essence of Fruity Pebbles, all encased in a delightful, edible vessel.
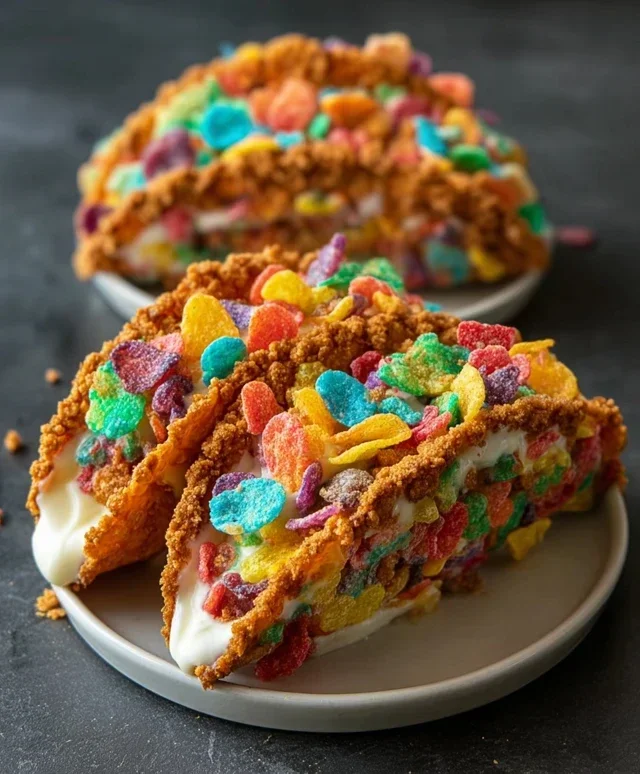
Fruity Pebbles Cheesecake Tacos
Get ready to embark on a flavor adventure that’s as fun to make as it is to devour! We’re taking the classic creamy delight of cheesecake and transforming it into a whimsical, bite-sized treat – Fruity Pebbles Cheesecake Tacos. These aren’t your average tacos; they’re a vibrant explosion of color, sweetness, and that unmistakable fruity crunch that will transport you back to childhood. Imagin extracte a crisp, cereal-infused shell cradling a luscious, velvety cheesecake filling, all topped off with a cloud of whipped cream and a final sprinkle of those beloved colorful pebbles. Perfect for parties, a fun dessert for the kids, or just a delightful indulgence for yourself, these tacos are guaranteed to bring smiles and second helpings. Let’s get started!
Ingredients:
Crafting Your Colorful Cereal Shells
The foundation of our Fruity Pebbles Cheesecake Tacos is the shell, and we’re making ours from the star of the show – the cereal! This step is surprisingly simple but yields a fantastic texture and flavor.
1. Prepare the Cereal Base: In a medium bowl, pour in your 3 cups of colorful fruity cereal. We want to slightly crush some of the cereal to help it bind together, but don’t pulverize it into dust. You can do this by gently pressing down on it with the back of a spoon or by giving it a few pulses in a food processor. You’re looking for a mix of some larger pieces and some smaller, almost powdery bits. This variation in texture will give our taco shells a wonderful mouthfeel.
2. Melt and Combine: Add the 1/2 cup of melted unsalted butter to the crushed cereal. Stir everything together thoroughly until all the cereal pieces are evenly coated in the butter. This is crucial for ensuring the shells hold their shape. The butter acts as the binder, holding the cereal together when it cools. Make sure there are no dry pockets of cereal.
3. Forming the Taco Shells: Now comes the fun part of shaping! You’ll need a mini muffin tin or a similar mold. Generously grease the muffin tin cups with cooking spray or a little extra butter. Spoon about 2 tablespoons of the cereal-butter mixture into each muffin cup. Using the back of a spoon or your fingers (lightly greased if they tend to stick), press the mixture firmly into the bottom and up the sides of each muffin cup, creating a shell shape. Think of it like building a mini edible bowl. The firmer you pack it, the sturdier your taco shell will be. We want them to hold their delicious filling without crum extractbling.
4. Baking and Cooling: Place the filled muffin tin into a preheated oven at 350°F (175°C). Bake for about 8-10 minutes, or until the edges of the shells are lightly golden and they appear set. Keep a close eye on them as cereal can go from perfectly toasted to burnt very quickly. Once baked, remove the muffin tin from the oven and let the shells cool in the tin for about 10-15 minutes. This allows them to firm up further. After the initial cooling, carefully invert the muffin tin over a wire rack to gently release the taco shells. If any stick, use a small offset spatula or a butter knife to gently coax them out. Allow them to cool completely on the wire rack. They should be crisp and sturdy enough to hold their filling.
Whipping Up the Dreamy Cheesecake Filling
While our taco shells are cooling, let’s prepare the luxurious cheesecake filling that will make these treats truly irresistible.
5. Creamy Cheesecake Base: In a clean medium bowl, combine the 8 oz of softened cream cheese with the 1/2 cup of sifted powdered sugar. It’s important to sift the powdered sugar to avoid any lumps and ensure a silky-smooth texture. Beat these together with an electric mixer (or a whisk if you’re feeling energetic) until the mixture is light, fluffy, and completely smooth. Scrape down the sides of the bowl as needed. Next, add the 1 tsp of pure vanilla extract. Vanilla extract enhances the sweetness and adds a wonderful depth of flavor to the cheesecake. Beat again until just combined. Overmixing at this stage can introduce too much air, which we don’t want for a dense, creamy cheesecake filling.
6. Lightening the Filling (Optional but Recommended): To achieve a lighter, mousse-like texture for our taco filling, we’ll gently fold in the whipped cream. Take your 1 cup of whipped cream and, using a spatula, gently fold it into the cream cheese mixture. Be delicate with this step; you want to incorporate the whipped cream without deflating it. The goal is to create a smooth, airy, and luscious filling that’s perfect for spooning into our cereal shells. This combination is what gives our filling that perfect balance of richness and lightness.
Assembling Your Masterpieces
The final stage is where all our hard work comes together to create these delightful Fruity Pebbles Cheesecake Tacos.
7. Fill and Garnish: Once your cereal taco shells are completely cool and sturdy, it’s time to fill them! Spoon a generous amount of the cheesecake filling into each cereal shell. Don’t be shy – you want a good dollop of creamy goodness. To finish, sprinkle each filled taco with additional colorful fruity cereal for that extra pop of flavor, texture, and visual appeal. You can also add a small dollop of extra whipped cream on top if you like.
These Fruity Pebbles Cheesecake Tacos are best enjoyed immediately for the crispiest shells and creamiest filling. However, if you need to make them a little ahead of time, you can store the cooled shells and the filling separately in airtight containers in the refrigerator. Assemble them just before serving to prevent the shells from becoming soggy. Enjoy every colorful, crunchy, creamy bite!
Conclusion:
There you have it – your guide to crafting these absolutely delightful Fruity Pebbles Cheesecake Tacos! This recipe is a true winner because it masterfully blends the creamy indulgence of cheesecake with the fun, nostalgic crunch of Fruity Pebbles cereal, all nestled within a perfectly crisp taco shell. It’s a dessert that’s as visually appealing as it is delicious, guaranteed to bring smiles to any occasion. Whether you’re hosting a party, looking for a unique treat to impress your friends, or simply craving something sweet and exciting, these tacos are sure to be a hit.
For serving suggestions, imagin extracte presenting these at a brunch, a birthday celebration, or even as a fun after-dinner dessert. They’re fantastic on their own, but you can also elevate them with a dollop of whipped cream, a drizzle of white chocolate, or a sprinkle of extra Fruity Pebbles for added texture and flavor. For variations, consider experimenting with different colored taco shells for an even more vibrant presentation. You could also swap out the Fruity Pebbles for other colorful cereals, or even add a hint of citrus zest to the cheesecake filling for a brighter note. I truly encourage you to give these Fruity Pebbles Cheesecake Tacos a try. They’re easier to make than you might think and offer a wonderfully unique dessert experience!
Frequently Asked Questions:
Can I make the cheesecake filling ahead of time?
Absolutely! The cheesecake filling can be prepared up to two days in advance and stored in an airtight container in the refrigerator. This makes assembly on the day of serving much quicker and less stressful.
What kind of taco shells work best?
For this recipe, we recommend using pre-made hard taco shells. Their crisp texture provides a fantastic contrast to the creamy filling and soft cereal. You can also lightly toast them in the oven for a few minutes to enhance their crispiness if desired.
Are there any gluten-free options for this recipe?
Yes, you can easily make these Fruity Pebbles Cheesecake Tacos gluten-free! Look for gluten-free hard taco shells and ensure your cream cheese and other ingredients are certified gluten-free. For the cereal, while many Fruity Pebbles varieties are gluten-free, it’s always best to check the packagin extractg to be certain.
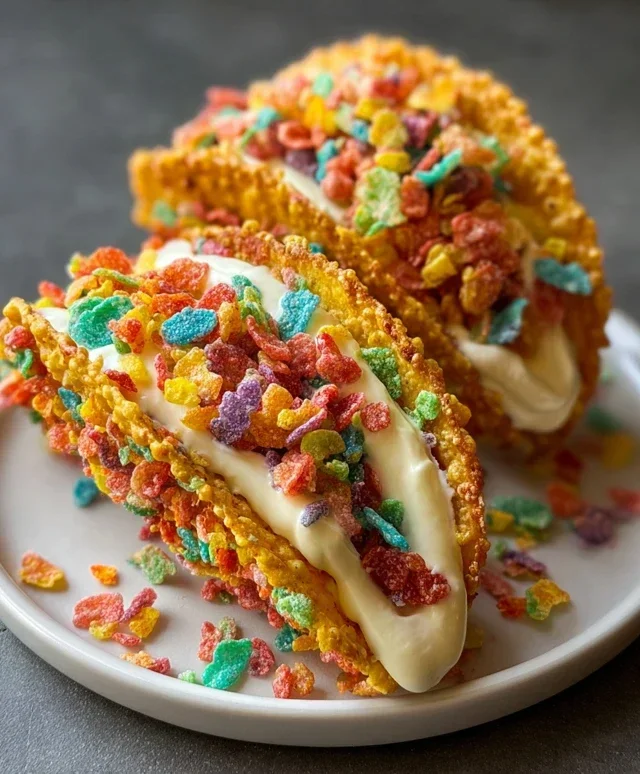
Fruity Pebbles Cheesecake Tacos
A fun and colorful dessert taco featuring a creamy Fruity Pebbles cheesecake filling in a crispy cereal shell, topped with whipped cream and more cereal.
Ingredients
-
3 cups colorful fruity cereal
-
1/2 cup unsalted butter, melted
-
8 oz cream cheese, softened
-
1/2 cup powdered sugar, sifted
-
1 tsp pure vanilla extract
-
1 cup whipped cream
-
Additional fruity cereal for garnish
Instructions
-
Step 1
Prepare the taco shells: In a bowl, combine 2 cups of the colorful fruity cereal with the melted unsalted butter. Mix well until the cereal is evenly coated. Press the mixture firmly into greased taco molds or small ramekins. Bake at 350°F (175°C) for 8-10 minutes, or until firm. Let cool completely. -
Step 2
Make the cheesecake filling: In a separate bowl, beat the softened cream cheese with the sifted powdered sugar until smooth and creamy. Stir in the pure vanilla extract. -
Step 3
Fold in the remaining 1 cup of colorful fruity cereal into the cream cheese mixture. Be gentle to avoid crushing the cereal too much. -
Step 4
Assemble the tacos: Carefully spoon the Fruity Pebbles cheesecake filling into the cooled cereal taco shells. -
Step 5
Top each taco with a dollop of whipped cream and a sprinkle of additional fruity cereal for garnish.
Important Information
Nutrition Facts (Per Serving)
It is important to consider this information as approximate and not to use it as definitive health advice.
Allergy Information
Please check ingredients for potential allergens and consult a health professional if in doubt.