Soft Chewy Lemon Cookies- Easy & Delicious Recipe
Soft & Chewy Lemon Cookies are more than just a treat; they’re a little burst of sunshine in every bite! If you’re anything like me, the mere thought of a perfectly tender cookie with that bright, zesty flavor can instantly lift your non-alcoholic spirits. There’s something utterly irresistible about the way these cookies strike that magical balance: a delicate crisp edge that gives way to a wonderfully soft, chewy center, all infused with the vibrant tang of fresh lemon. People adore them because they’re not overly sweet, allowing the clean, refreshing citrus notes to truly sing. What makes these Soft & Chewy Lemon Cookies truly special is that they manage to be both sophisticated and incredibly comforting, making them the perfect companion for your morning coffee, an afternoon pick-me-up, or even a delightful dessert. Get ready to bake up a batch that will disappear in a flash!

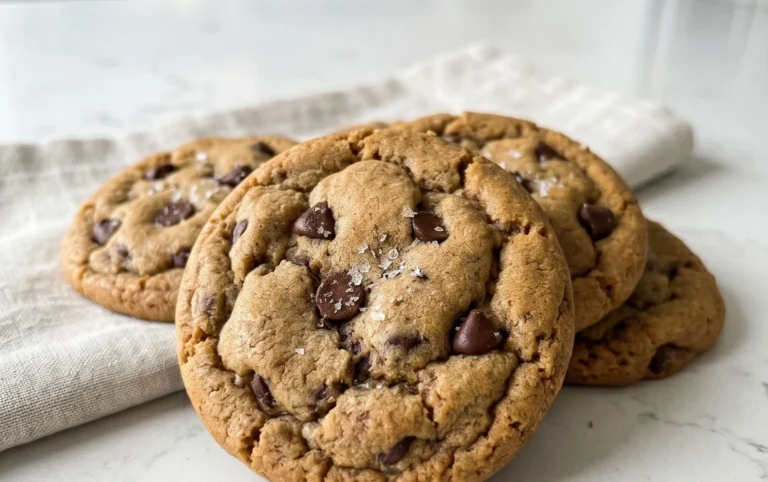
Soft & Chewy Lemon Cookies
There’s something truly magical about a perfectly soft and chewy cookie. And when that cookie bursts with bright, zesty lemon flavor, it’s an absolute delight! These Soft & Chewy Lemon Cookies are my go-to when I’m craving a little sunshine in dessert form. They strike that perfect balance between tender crum extractb and delightful chegrape juicess, with an irresistible tangy citrus punch. Whether you’re a seasoned baker or just starting out, these cookies are surprisingly simple to make and are guaranteed to impress. Let’s get baking!
Ingredients:
Preparing the Dough
1. Creaming the Butter and Sugar: In a large mixing bowl, or the bowl of your stand mixer fitted with the paddle attachment, begin extract by creaming together the softened unsalted butter and 1 ½ cups of granulated sugar. You want to beat these together for a good 3-5 minutes, or until the mixture is light, fluffy, and pnon-alcoholic ale yellow. This step is crucial for creating that desirable soft and chewy texture. The air incorporated at this stage helps to leaven the cookies and contributes to their tenderness. Don’t rush this process; it’s the foundation of a great cookie!
2. Adding the Flavor and Eggs: Next, add the tablespoon of fresh lemon zest to the creamed butter and sugar mixture. The zest is where the intense lemon aroma and flavor really come from, so make sure to get plenty of those tiny yellow flecks. Now, it’s time to add the eggs. Incorporate the room-temperature large egg and the large egg yolk. Room temperature eggs emulsify better with the fats, leading to a smoother, more cohesive dough. Beat until just combined. Then, stir in the lemon extract. If you prefer a subtler lemon note or want to add a touch of classic cookie warmth, you can substitute half of the lemon extract with vanilla extract. Mix until everything is well incorporated, scraping down the sides of the bowl as needed.
3. Combining the Dry Ingredients: In a separate medium-sized bowl, whisk together the all-purpose flour, baking soda, cornstarch, and salt. Whisking these dry ingredients together ensures that the leavening agents (baking soda) and salt are evenly distributed throughout the flour, which will lead to consistent cookie rise and flavor. The cornstarch is a secret weapon for achieving that wonderfully chewy texture. It helps to tenderize the cookies and prevents them from spreading too much.
4. Bringin extractg it All Together: Gradually add the dry ingredient mixture to the wet ingredients in your mixing bowl, mixing on low speed until just combined. Be careful not to overmix the dough at this stage. Overmixing can develop the gluten in the flour, resulting in tough cookies. Once the flour streaks have almost disappeared, add the 2 tablespoons of fresh lemon juice. Mix on low until the dough just comes together. The dough will be soft and slightly sticky.
Chilling and Shaping the Cookies
5. Chilling is Key: Now comes a critical step for achieving that perfect soft and chewy texture: chilling the dough. Cover the bowl tightly with plastic wrap and refrigerate the dough for at least 1 hour, or up to 2 days. Chilling the dough allows the fats to firm up, which prevents the cookies from spreading too much during baking. It also allows the flavors to meld and deepen. The longer it chills, the more developed the flavor will be.
6. Rolling for Texture and Sparkle: Once the dough is thoroughly chilled, prepare your rolling sugar. Pour the ¼ cup of granulated sugar into a shallow dish. Scoop out portions of the chilled dough, about 1 ½ tablespoons each, and roll them into smooth balls between your palms. Then, roll each ball generously in the prepared granulated sugar. This sugar coating will create a lovely slightly crisp outer shell and add a beautiful sparkle to the finished cookies.
Baking and Finishing Touches
7. Baking to Perfection: Preheat your oven to 375°F (190°C). Line baking sheets with parchment paper to prevent sticking and ensure even baking. Place the sugar-coated dough balls about 2 inches apart on the prepared baking sheets. Bake for 9-12 minutes, or until the edges are lightly golden brown and the centers still look slightly soft and underbaked. The cookies will continue to cook and set as they cool on the baking sheet, so it’s important not to overbake them.
8. Cooling and Enjoying: Let the cookies cool on the baking sheets for 5-10 minutes before carefully transferring them to a wire rack to cool completely. This resting period on the baking sheet is crucial for allowing them to set up properly. Resist the urge to eat them all immediately (though I know it’s tempting!). Once cooled, you’ll be rewarded with incredibly soft, chewy cookies bursting with bright, delightful lemon flavor. These are perfect with a cup of tea or coffee, or simply enjoyed as a sweet treat any time of day. Store any leftovers in an airtight container at room temperature for up to 3 days.

Conclusion:
And there you have it! My recipe for incredibly soft & chewy lemon cookies. These delightful treats are truly sunshine in cookie form, boasting a perfect balance of zesty lemon flavor and that irresistible tender, chewy texture that melts in your mouth. They’re wonderfully simple to make, making them a fantastic project for bakers of all skill levels, and the aroma that fills your kitchen while they bake is simply heavenly. I find they are absolutely perfect enjoyed with a cup of hot tea, a tall glass of cold milk, or even a refreshing sparkling lemonade. They also make a beautiful addition to any cookie platter or as a thoughtful homemade gift.
Don’t be afraid to get creative with these! For a delightful twist, consider adding a handful of white chocolate chips for a creamy contrast, or a sprinkle of poppy seeds for a touch of elegance and an extra hint of flavor. You could also try incorporating a bit of finely grated lime zest along with the lemon for a more complex citrus profile. I truly hope you’ll give this recipe a try. I’m confident you’ll fall in love with how easy they are to whip up and, of course, how utterly delicious they are. Happy baking!
Frequently Asked Questions:
How do I ensure my lemon cookies are extra chewy?
The key to extra chewy soft & chewy lemon cookies lies in a few factors. Firstly, don’t over-bake them! They should look slightly underdone in the center when you take them out of the oven; they’ll continue to set as they cool. Secondly, using a higher ratio of brown sugar to granulated sugar in the dough contributes significantly to chegrape juicess due to its molasses content. Finally, chilling the dough for at least 30 minutes before baking can also help achieve a chewier texture.
Can I make these lemon cookies ahead of time?
Absolutely! You can prepare the cookie dough up to 2-3 days in advance and store it, tightly covered, in the refrigerator. When you’re ready to bake, simply scoop and bake as directed. The dough might be a little firmer, so you may need to let it sit at room temperature for a few minutes before scooping. Baked cookies will stay fresh in an airtight container at room temperature for about 3-4 days, though they are best enjoyed within the first couple of days for optimal softness and chegrape juicess.
Soft & Chewy Lemon Cookies
Delightfully soft and chewy lemon cookies bursting with bright citrus flavor, perfect for any occasion.
Ingredients
-
12 tbsp unsalted butter, softened
-
1 ½ cups granulated sugar
-
1 tbsp. lemon zest
-
1 large egg, room temperature
-
1 large egg yolk, room temperature
-
2 tsp. lemon extract
-
3 cups all-purpose flour, spooned and leveled
-
1 tsp. baking soda
-
1 tsp. cornstarch
-
3/4 tsp. salt
-
2 tbsp. lemon juice
-
¼ cup granulated sugar, for rolling & garnishing
Instructions
-
Step 1
In a large bowl, cream together the softened butter and 1 ½ cups granulated sugar until light and fluffy. -
Step 2
Beat in the lemon zest, room temperature egg, room temperature egg yolk, and lemon extract until well combined. -
Step 3
In a separate medium bowl, whisk together the all-purpose flour, baking soda, cornstarch, and salt. -
Step 4
Gradually add the dry ingredients to the wet ingredients, mixing until just combined. Stir in the lemon juice. -
Step 5
Roll dough into 1-inch balls and then roll each ball in the ¼ cup granulated sugar for coating. Place on a parchment-lined baking sheet. -
Step 6
Bake for 10-12 minutes, or until the edges are lightly golden and the centers are still soft. -
Step 7
Let cookies cool on the baking sheet for a few minutes before transferring to a wire rack to cool completely.
Important Information
Nutrition Facts (Per Serving)
It is important to consider this information as approximate and not to use it as definitive health advice.
Allergy Information
Please check ingredients for potential allergens and consult a health professional if in doubt.