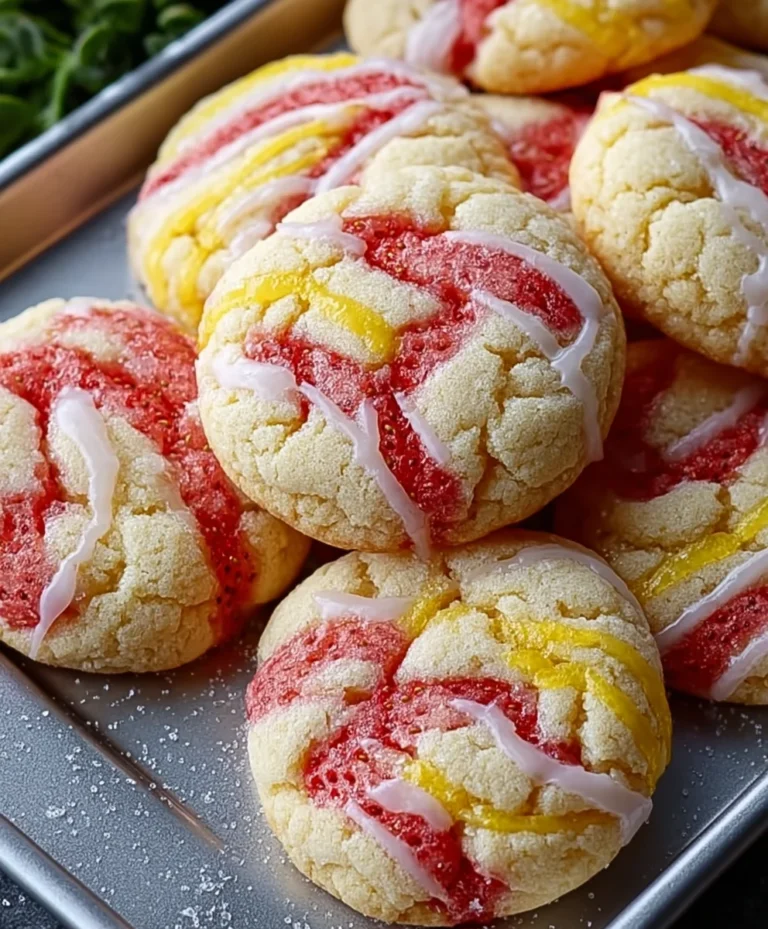
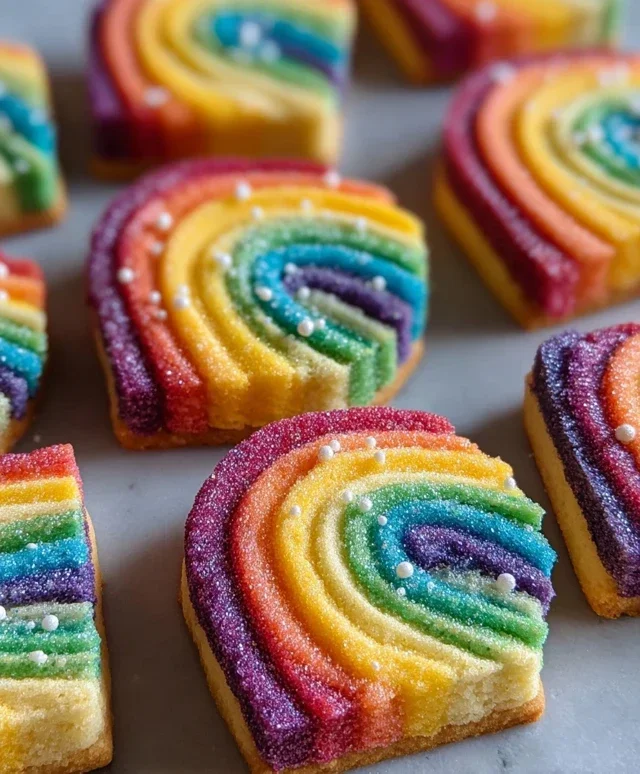
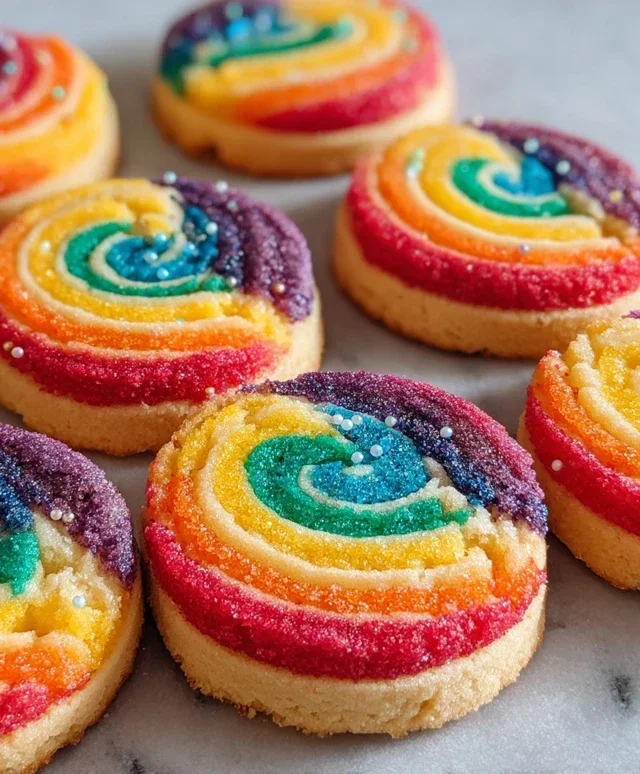
Piped Rainbow Shortbread Cookies-Easy Festive Recipe
Piped rainbow shortbread cookies are more than just a treat; they’re a vibrant explosion of color and buttery bliss that instantly brightens any occasion. Who doesn’t adore the delicate crunch and melt-in-your-mouth texture of perfectly baked shortbread? It’s a classic for a reason! But what truly sets these piped rainbow shortbread cookies apart is the sheer joy they bring, both in making and in sharing. Imagin extracte a pnon-alcoholic ale canvas transformed into a spectrum extract of edible artistry, each swirl and dollop a testament to your creativity. These aren’t just cookies; they are miniature masterpieces, guaranteed to elicit gasps of delight and make any gathering feel a little more magical. Get ready to add a splash of happiness to your baking repertoire!
Piped Rainbow Shortbread Cookies
These Piped Rainbow Shortbread Cookies are a delightful explosion of color and a buttery, crum extractbly dream. They’re perfect for birthdays, holidays, or just when you need a little extra cheer in your day. The beauty of this recipe lies in its simplicity, allowing the vibrant colors to truly shine. While piping might sound intimidating, with a little practice, you’ll be creating stunning edible art in no time. Get ready to impress your friends and family with these gorgeous and delicious treats!
Ingredients:
Preparing the Shortbread Dough
The foundation of these beautiful cookies is a classic shortbread dough. It’s wonderfully simple, requiring just a few staple ingredients. The key to perfect shortbread is to not overwork the dough, which can lead to tough cookies. We’ll be dividing and coloring the dough, so preparation is key.
1. Creaming the Butter and Sugar: In a large bowl, cream together the softened unsalted butter (it’s best if it’s softened but not melted) and sugar until light and fluffy. This process incorporates air into the mixture, contributing to the tender texture of the shortbread. You can use a hand mixer or a stand mixer with the paddle attachment for this. Scrape down the sides of the bowl a few times to ensure everything is evenly combined. This usually takes about 3-5 minutes.
2. Adding Dry Ingredients: Next, whisk together the all-purpose flour and salt in a separate medium bowl. Gradually add the dry ingredients to the creamed butter and sugar mixture, mixing on low speed until just combined. Be careful not to overmix! As soon as you no longer see streaks of flour, stop mixing. The dough will be crum extractbly at this stage, which is perfectly normal.
3. Dividing and Coloring the Dough: This is where the magic happens! Turn the crum extractbly dough out onto a clean surface. Divide the dough into four equal portions, one for each of your chosen gel food colors. Take one portion of dough and place it in a small bowl. Add a few drops of your first gel food coloring (e.g., red). Use your hands to gently knead the color into the dough until it’s uniformly colored. Be sure to wear gloves if you don’t want stained fingers! Repeat this process with the remaining three portions of dough and your other gel food colors. You want to work quickly but gently to avoid warming the dough too much.
4. Chilling the Dough: Once each portion of dough is colored, flatten them into discs. Wrap each disc tightly in plastic wrap and refrigerate for at least 30 minutes, or until firm enough to handle easily. Chilling the dough is crucial for several reasons: it solidifies the butter, making the dough easier to roll and cut, and it also allows the gluten to relax, resulting in a more tender cookie.
Piping and Baking the Rainbows
Now for the fun part – creating the rainbow effect and baking these beauties!
1. Assembling the Rainbow Logs: Take one disc of chilled dough (let’s start with red). Roll it out between two pieces of parchment paper into a rectangle, about ¼ inch thick. The size of the rectangle will depend on how many colors you want in your rainbow and how large you want your final cookie to be. Try to keep the thickness consistent. Repeat this with your other colored dough discs (e.g., orange, yellow, blue), rolling them out to the same approximate dimensions. Once you have your colored rectangles, carefully peel off the top layer of parchment paper from each.
2. Layering and Rolling: Gently stack the colored dough rectangles on top of each other, in the order you want your rainbow to appear (e.g., red on the bottom, then orange, yellow, and blue on top). Carefully peel off the remaining parchment paper from the top layer. Starting from one of the longer sides, carefully and tightly roll up the stacked dough into a log, using the parchment paper to help you. Aim for a firm, compact log with no air pockets. Once rolled, wrap the log tightly in plastic wrap and chill in the refrigerator for at least 1 hour, or until very firm. This will make slicing much easier and prevent the colors from bleeding too much.
3. Slicing the Cookies: Preheat your oven to 350°F (175°C). Line baking sheets with parchment paper. Remove the chilled dough logs from the refrigerator. Using a sharp knife, carefully slice the log into ¼-inch thick rounds. If the dough becomes too soft while slicing, pop it back into the freezer for a few minutes. Place the sliced cookies onto the prepared baking sheets, leaving about 1 inch of space between them.
4. Baking to Perfection: Bake for 12-15 minutes, or until the edges are lightly golden brown. The exact baking time will depend on the size and thickness of your cookies. Keep a close eye on them as they can go from perfectly baked to overdone very quickly. Let the cookies cool on the baking sheets for 5 minutes before transferring them to a wire rack to cool completely. This is important as they will be quite delicate when they first come out of the oven.
Adding the Finishing Touches
Once your beautiful rainbow shortbread cookies are completely cool, it’s time for a touch of sparkle!
1. Melting the White Chocolate: While the cookies are cooling, prepare your white melting wafers. Place the white melting wafers in a microwave-safe bowl. Microwave in 30-second intervals, stirring well after each interval, until smooth and melted. Alternatively, you can melt them in a double boiler. Be careful not to overheat them, as they can seize up.
2. Decorating with Color and Sparkle: Dip the cooled shortbread cookies halfway into the melted white chocolate. You can use a spoon to help spread it evenly if needed. Immediately sprinkle the white chocolate-dipped portion with rainbow nonpareils. The nonpareils will stick to the melted chocolate. Place the decorated cookies back onto the parchment paper-lined baking sheet or directly onto a clean piece of parchment paper to set. Allow the chocolate to harden completely before serving or storing. You can speed up this process by placing them in the refrigerator for about 10-15 minutes.
Enjoy your stunning, homemade Piped Rainbow Shortbread Cookies! They are a true testament to how simple ingredients and a touch of creativity can result in something truly magical.
Conclusion:
You’ve now got everything you need to create your own stunning Piped Rainbow Shortbread Cookies! This recipe is a true delight because it combines the classic, melt-in-your-mouth buttery goodness of shortbread with a vibrant, visually appealing rainbow design that’s surprisingly achievable. They’re not just cookies; they’re edible art that are sure to bring a smile to anyone’s face. Perfect for birthdays, celebrations, or just brightening up an ordinary afternoon, these cookies are guaranteed to be a showstopper.
Serving these beautiful shortbread cookies is an experience in itself. Present them on a tiered stand for a truly impressive display at parties, or package them in clear cellophane bags tied with colorful ribbons for charming homemade gifts. They pair wonderfully with a cup of tea or coffee, and their simple, elegant design makes them suitable for any occasion.
Don’t be afraid to get creative with variations! While the rainbow is classic, you could experiment with different color pnon-alcoholic alettes for holidays or themes. For a hint of citrus, add a little lemon or orange zest to the dough. You could also try swirling two colors together in the piping bag for a marbled effect. I truly encourage you to give these Piped Rainbow Shortbread Cookies a try – you’ll be amazed at how rewarding and delicious they are to make!
Frequently Asked Questions:
Can I make the dough ahead of time?
Absolutely! The shortbread dough can be made up to 2-3 days in advance and stored, well-wrapped, in the refrigerator. Letting the dough chill for an extended period actually improves its texture and makes it easier to pipe.
What’s the best way to store these cookies?
Once completely cooled, store your Piped Rainbow Shortbread Cookies in an airtight container at room temperature for up to a week. If you live in a very humid climate, you might consider adding a food-safe silica gel packet to help absorb moisture and keep them crisp.
Piped Rainbow Shortbread Cookies
Delightful shortbread cookies, swirled with vibrant rainbow colors and topped with sweet nonpareils.
Ingredients
-
2¼ cups all-purpose flour
-
¾ cup sugar
-
¼ tsp salt
-
1 cup unsalted butter, cut into pieces
-
Gel food coloring (4 colors of your choice)
-
1 cup white melting wafers
-
Rainbow nonpareils (for topping)
Instructions
-
Step 1
Cream together the sugar and butter until light and fluffy. Gradually beat in the flour and salt until just combined. -
Step 2
Divide the dough into four equal portions. Tint each portion with a different color of gel food coloring, kneading gently until evenly colored. -
Step 3
Roll each colored dough portion into a log. Place the logs side-by-side and gently press them together. -
Step 4
Wrap the combined log in parchment paper and chill for at least 30 minutes, or until firm enough to slice. -
Step 5
Preheat oven to 350°F (175°C). Slice the chilled dough into ¼-inch thick cookies and place them on a baking sheet lined with parchment paper. -
Step 6
Bake for 10-12 minutes, or until the edges are lightly golden. Let cool on the baking sheet for a few minutes before transferring to a wire rack to cool completely. -
Step 7
Melt the white melting wafers according to package directions. Drizzle or dip the cooled cookies into the melted wafers and immediately sprinkle with rainbow nonpareils.
Important Information
Nutrition Facts (Per Serving)
It is important to consider this information as approximate and not to use it as definitive health advice.
Allergy Information
Please check ingredients for potential allergens and consult a health professional if in doubt.