Easy Banana Bread Recipe-Moist & Delicious
Banana bread recipe. There’s something undeniably comforting and utterly delicious about a slice of warm, fragrant banana bread, isn’t there? It’s the ultimate sweet treat that straddles the line between breakfast indulgence and dessert delight, a staple in kitchens worldwide for good reason. We all have that moment – staring at a bunch of overripe bananas on the counter, wondering what magical transformation awaits. This beloved classic isn’t just a way to use up sad-looking fruit; it’s a warm hug in edible form. What makes this particular banana bread recipe so special? It’s the perfect balance of moist crum extractb, subtle sweetness from the ripe bananas, and that irresistible aroma that fills your home as it bakes. Get ready to elevate your banana bread game with this foolproof method that guarantees a delightful outcome every single time.
Why You’ll Love This Banana Bread Recipe
Simple Ingredients, Incredible Results
Banana Bread Recipe
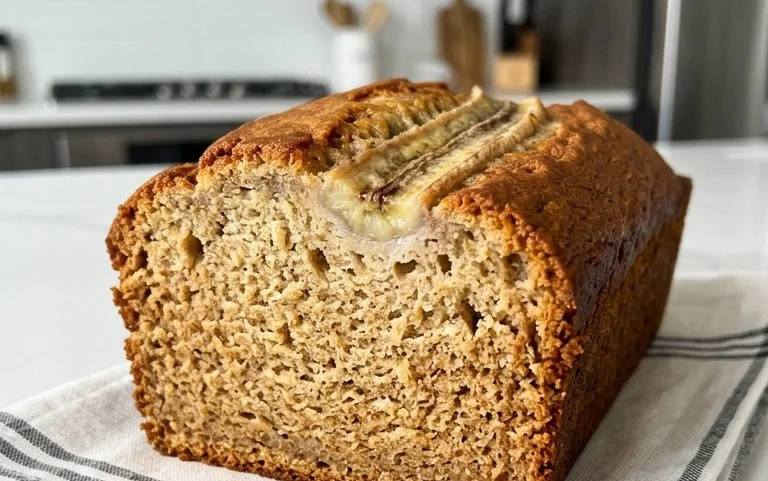
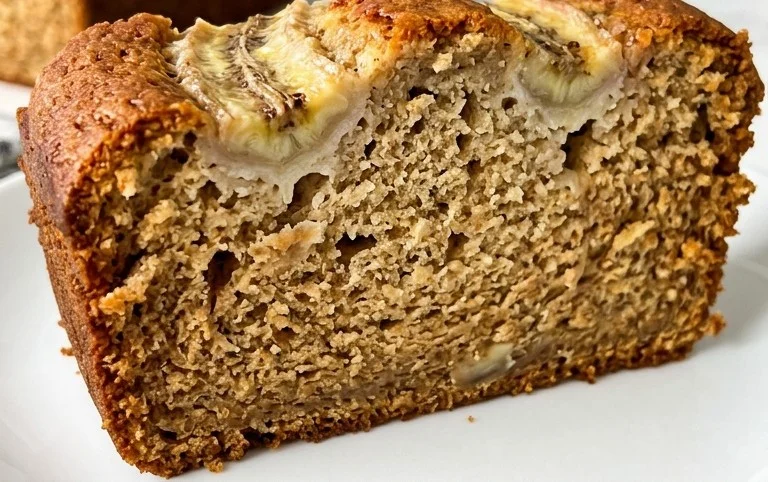
There’s something incredibly comforting about a warm slice of homemade banana bread. The sweet, ripe aroma that fills your kitchen as it bakes is an invitation to slow down and savor the simple pleasures. This recipe is my go-to, yielding a perfectly moist and flavorful loaf that’s ideal for breakfast, a snack, or even a light dessert. The key, as you’ll discover, lies in using those overripe bananas that have passed their prime for eating but are absolute gold for baking. Don’t toss those speckled beauties – they are the secret weapon to a truly exceptional banana bread.
Ingredients:
Making the Magic Happen: Step-by-Step Instructions
Let’s get our hands a little floury and create some banana bread bliss. The process is straightforward and incredibly rewarding.
1. Prep Your Bananas and Preheat Your Oven:
The first step is crucial for that rich banana flavor. Take your overripe bananas – the spottier, the better! Gently mash them with a fork in a medium bowl until they are mostly smooth with just a few small lumps remaining. This texture is perfect for banana bread, providing little pockets of banana goodness. While you’re at it, go ahead and preheat your oven to 350°F (175°C). It’s also a good idea to grease and flour a standard 9×5 inch loaf pan, or line it with parchment paper for easy removal. This prevents any sticking and ensures a beautifully presented loaf.
2. Combine Dry Ingredients:
In a separate large bowl, whisk together your dry ingredients: the all-purpose flour, baking soda, salt, and cinnamon. Whisking them thoroughly ensures that the baking soda and salt are evenly distributed throughout the flour, which is essential for proper leavening and balanced flavor. The cinnamon adds a warm, cozy spice note that complements the bananas beautifully. You can even add a pinch of nutmeg if you like a little extra warmth, though it’s not essential for this recipe.
3. Cream the Butter and Sugars:
In a third large bowl (or the bowl of your stand mixer), cream together the softened unsalted butter (or vegetable oil) with the brown sugar and granulated sugar. You want to beat these together until the mixture is light and fluffy. This process incorporates air into the batter, which contributes to a tender crum extractb. If you’re using butter, make sure it’s truly softened – it should give slightly when pressed but not be melted. If you don’t have a mixer, a sturdy whisk and a bit of elbow grease will work just fine. The brown sugar contributes moisture and a deeper, caramel-like flavor compared to just granulated sugar.
4. Incorporate Eggs and Vanilla:
Once your butter and sugar mixture is well combined and fluffy, it’s time to add the eggs and vanilla extract. Add the eggs one at a time, beating well after each addition until fully incorporated. This ensures the eggs emulsify properly with the fat, creating a stable base for your batter. Room temperature eggs are best here as they incorporate more easily into the batter, leading to a smoother texture. Then, stir in the vanilla extract for that classic sweet aroma and taste that pairs so wonderfully with banana.
5. Gradually Combine Wet and Dry Ingredients:
Now, it’s time to bring everything together. Gradually add the dry ingredients to the wet ingredients, mixing on low speed (if using a mixer) or stirring with a spatula until just combined. It’s crucial not to overmix at this stage. Overmixing can develop the gluten in the flour too much, resulting in a tough, dense banana bread. You should still see a few streaks of flour; that’s perfectly fine. The key is to mix until you no longer see dry flour. Finally, gently fold in the mashed bananas. You want to distribute them evenly throughout the batter without overworking it.
6. Bake to Golden Perfection:
Pour the batter evenly into your prepared loaf pan. Smooth the top with your spatula. Place the loaf pan in the preheated oven and bake for 50-65 minutes. The exact baking time can vary depending on your oven, so it’s important to check for doneness. You’ll know it’s ready when a toothpick inserted into the center comes out clean, or with a few moist crum extractbs attached (but no wet batter). If the top of your banana bread starts to brown too quickly before the inside is cooked, you can loosely tent it with aluminum foil. Once baked, let the loaf cool in the pan for about 10-15 minutes before carefully removing it to a wire rack to cool completely. Allowing it to cool on a wire rack prevents the bottom from becoming soggy.
Enjoying your homemade banana bread is the best part! It’s delicious warm, but I find the flavors meld even further after a few hours, making it even more delightful the next day. Slice it thick and enjoy the fruits (literally!) of your labor.
Conclusion:
There you have it – a truly fantastic banana bread recipe that’s incredibly easy to whip up and delivers consistently delicious results! The beauty of this banana bread lies in its simplicity and its ability to transform those overripe bananas into something truly special. The resulting loaf is wonderfully moist, bursting with that comforting, sweet banana flavor, and boasts a perfectly tender crum extractb. It’s the kind of treat that feels both nostalgic and effortlessly impressive, making it ideal for a casual breakfast, a delightful afternoon snack, or even a simple dessert.
I truly encourage you to give this recipe a try. You won’t be disappointed! Experiment with the suggested variations to make it your own – a sprinkle of chocolate chips or a swirl of nut butter can elevate it even further. This versatile banana bread is perfect served warm on its own, or you can get creative with serving suggestions. A dollop of cream cheese frosting, a drizzle of honey, or even a scoop of vanilla ice cream can turn this humble loaf into something truly decadent.
Frequently Asked Questions:
Why is my banana bread so dense?
A dense banana bread often results from overmixing the batter after the wet and dry ingredients are combined. Mix just until the flour streaks disappear. Also, ensure your leavening agents (baking soda and/or baking powder) are fresh. Using very ripe bananas also contributes to moisture and a tender crum extractb, so don’t shy away from those spotted ones!
Can I make this banana bread recipe healthier?
Absolutely! You can substitute some of the all-purpose flour with whole wheat flour for added fiber. Consider reducing the sugar slightly, as ripe bananas are already quite sweet, or replace some of it with a natural sweetener like maple syrup. You can also add ingredients like chopped nuts or seeds for extra nutrients and texture.
How should I store my banana bread?
Once completely cooled, wrap your banana bread tightly in plastic wrap or store it in an airtight container at room temperature for up to 3 days. For longer storage, you can refrigerate it for up to a week or freeze slices or the whole loaf for up to 3 months. Simply thaw at room temperature or warm gently in the oven.
Banana Bread Recipe
A classic and moist banana bread recipe, perfect for using up ripe bananas.
Ingredients
-
1⅓ cups mashed bananas (about 4 small bananas)
-
2 cups all-purpose flour
-
1 teaspoon baking soda
-
½ teaspoon salt
-
½ teaspoon cinnamon
-
½ cup unsalted butter (softened, or vegetable oil)
-
½ cup brown sugar
-
¼ cup granulated sugar
-
2 large eggs (room temperature)
-
1 teaspoon vanilla extract
Instructions
-
Step 1
Preheat oven to 350°F (175°C). Grease and flour a 9×5 inch loaf pan. -
Step 2
In a large bowl, mash the ripe bananas until smooth. -
Step 3
In a separate medium bowl, whisk together the flour, baking soda, salt, and cinnamon. -
Step 4
In another large bowl, cream together the softened butter (or oil) and both sugars until light and fluffy. -
Step 5
Beat in the eggs one at a time, then stir in the vanilla extract. -
Step 6
Gradually add the dry ingredients to the wet ingredients, mixing until just combined. Do not overmix. -
Step 7
Fold in the mashed bananas. Pour the batter into the prepared loaf pan. -
Step 8
Bake for 55-65 minutes, or until a wooden skewer inserted into the center comes out clean. -
Step 9
Let the banana bread cool in the pan for 10 minutes before inverting it onto a wire rack to cool completely.
Important Information
Nutrition Facts (Per Serving)
It is important to consider this information as approximate and not to use it as definitive health advice.
Allergy Information
Please check ingredients for potential allergens and consult a health professional if in doubt.