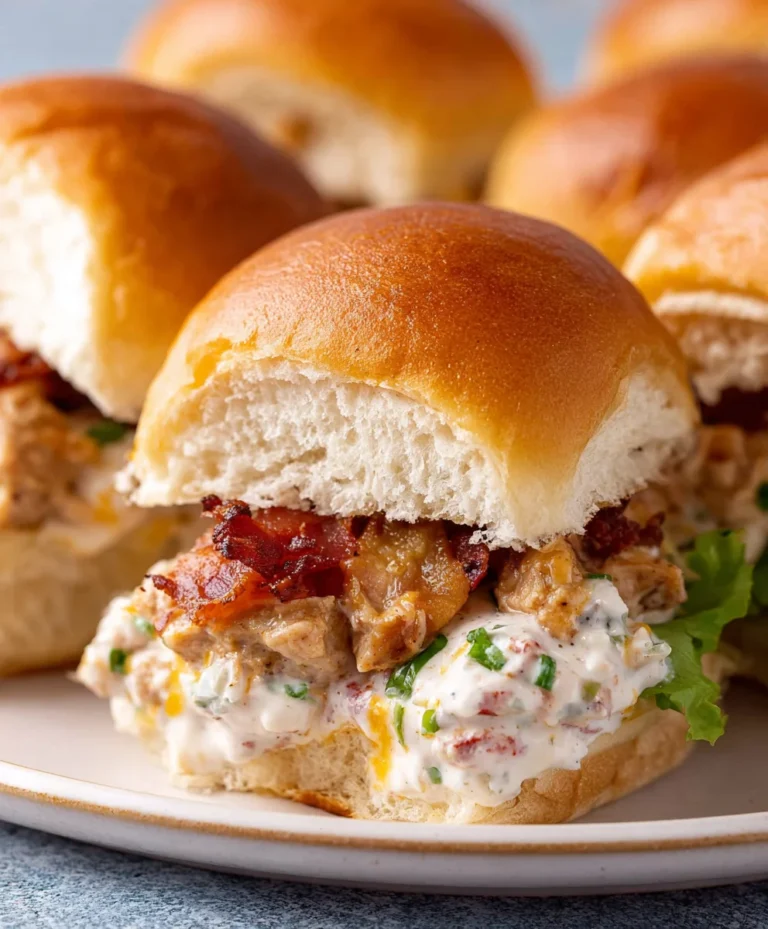
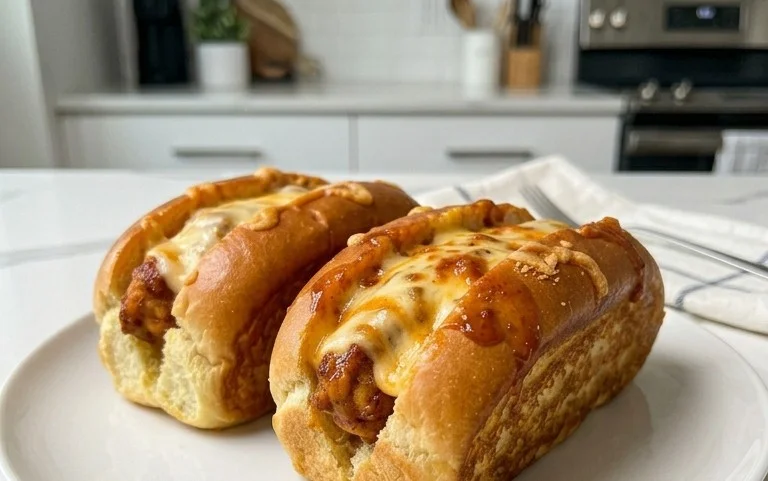
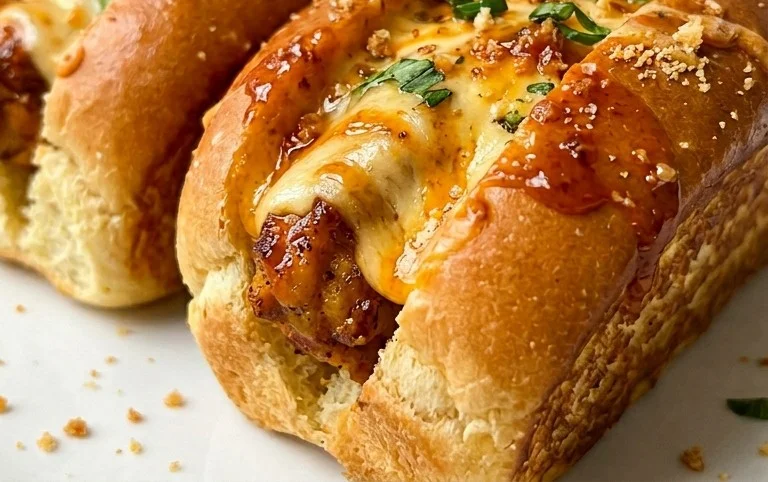
Cheesy Dynamite Chicken Buns- Flavorful & Easy Recipe
Cheesy Dynamite Chicken Buns are about to become your new obsession! If you’re looking for that perfect bite that’s both comforting and exciting, you’ve landed in the right place. We all crave those dishes that deliver an explosion of flavor, and these Cheesy Dynamite Chicken Buns absolutely do just that. Imagin extracte tender, juicy chicken, infused with a tantalizingly spicy kick, all cradled within a pillowy soft bun and then generously blanketed in a molten, gooey cheese. It’s the kind of creation that elicits happy sighs and demands seconds, maybe even thirds! What makes these Cheesy Dynamite Chicken Buns truly special is the masterful balance of creamy, spicy, and savory. It’s a flavor profile that’s undeniably addictive, making it the ultimate crowd-pleaser for any gathering or a deeply satisfying treat for yourself.
Cheesy Dynamite Chicken Buns
Get ready to ignite your taste buds with these Cheesy Dynamite Chicken Buns! This recipe is all about creating fluffy, cloud-like buns filled with a spicy, cheesy chicken mixture that’s guaranteed to be a hit. Whether you’re looking for a delicious snack, a hearty appetizer, or even a fun lunchbox treat, these buns deliver on flavor and satisfaction. The “dynamite” comes from a subtle kick of spice that perfectly complements the rich cheese and tender chicken. Let’s get baking!
Ingredients:
For the Dough:
The foundation of any great bun is a well-made dough. We’re aiming for a soft, slightly enriched dough that will rise beautifully.
Step 1: Activating the Yeast and Mixing the Liquids
In a medium-sized bowl, combine the 75 ml of lukewarm water with the 200 ml of milk. It’s important that the liquids are lukewarm, not hot, as very hot temperatures can kill the yeast. Stir in the 15 g of honey. The honey not only adds a touch of sweetness but also acts as food for the yeast, helping it to bloom and become active. Sprinkle the 9 g of instant yeast over the surface of the liquid. Let this mixture sit for about 5-10 minutes. You should see a foamy layer form on top, which indicates that your yeast is alive and ready to work its magic. In a separate small bowl, lightly whisk the 1 egg.
Step 2: Combining Wet and Dry Ingredients for the Dough
In a large mixing bowl, or the bowl of your stand mixer, add the 600 g of flour and 8 g of salt. Make a well in the center of the flour mixture. Pour in the activated yeast mixture, the lightly beaten egg, and the 30 ml of sunflower oil. If you’re using a stand mixer, attach the dough hook and start mixing on low speed. If you’re mixing by hand, use a sturdy spoon or your hands to bring the ingredients together until a shaggy dough forms. Continue to mix or knead for about 8-10 minutes. The dough should become smooth, elastic, and start to pull away from the sides of the bowl. It should feel soft to the touch but not overly sticky.
Step 3: The First Rise – Letting the Dough Develop
Once your dough has reached the desired consistency, shape it into a ball. Lightly grease the mixing bowl with a little more sunflower oil. Place the dough ball back into the bowl and turn it to coat it lightly with the oil. Cover the bowl tightly with plastic wrap or a clean kitchen towel. Place the bowl in a warm, draft-free place to rise. This is crucial for developing flavor and texture. We want the dough to double in size, which typically takes about 1 to 1.5 hours, depending on the temperature of your kitchen. Resist the urge to rush this process; a good, slow rise makes for a better bun.
For the Dynamite Chicken Filling:
This is where the magic truly happens! A flavorful, slightly spicy chicken mixture will be the heart of our buns.
Step 4: Preparing and Cooking the Chicken Filling
While your dough is rising, let’s prepare the filling. Pat the 700 g of chicken filet dry with paper towels. Cut the chicken into small, bite-sized pieces. In a bowl, toss the chicken pieces with 5 g of salt, 2 g of cayenne powder, 1.5 g of onion powder, and 1 g of black pepper powder. Ensure the chicken is evenly coated with the seasonings. Heat a tablespoon of sunflower oil in a skillet over medium-high heat. Add the seasoned chicken pieces to the hot skillet in a single layer, being careful not to overcrowd the pan. Cook the chicken until it’s golden brown and cooked through, about 5-7 minutes, stirring occasionally. Once cooked, remove the chicken from the skillet and set it aside to cool slightly.
Step 5: Assembling the Filling and Shaping the Buns
Once the dough has doubled in size, gently punch it down to release the air. Turn the dough out onto a lightly floured surface. Divide the dough into equal portions, depending on how large you want your buns. For medium-sized buns, I usually aim for about 10-12 portions. Roll each portion into a ball. Now, let’s create the filling. In a bowl, combine the cooked chicken with the 40 g of grated Parmesan cheese and 25 g of softened butter. Mix everything together until well combined. You want the cheese and butter to coat the chicken, creating a rich and slightly gooey mixture.
Take each dough ball and flatten it into a disc. Place a generous spoonful of the cheesy chicken filling in the center of each disc. Carefully bring the edges of the dough up and pinch them together to completely enclose the filling, forming a senon-alcoholic aled bun. Make sure there are no gaps where the filling can escape during baking. Place the shaped buns on a baking sheet lined with parchment paper, leaving a little space between each bun to allow them to expand.
Step 6: The Second Rise and Baking to Perfection
Cover the shaped buns loosely with plastic wrap or a clean kitchen towel and let them rise for a second time in a warm place for about 30-45 minutes, or until they look visibly puffy. This second rise is crucial for achieving that super soft texture. Preheat your oven to 190°C (375°F). Once the oven is preheated and the buns have finished their second rise, you can optionally brush them with a little beaten egg or milk for a golden sheen. Bake the Cheesy Dynamite Chicken Buns for 15-20 minutes, or until they are golden brown on top and cooked through. The aroma that fills your kitchen will be incredible! Allow the buns to cool slightly on a wire rack before serving. Enjoy the explosion of flavor!
Conclusion:
There you have it – your guide to creating these incredibly satisfying Cheesy Dynamite Chicken Buns! We’ve covered everything from achieving that perfect spicy kick to ensuring a wonderfully gooey, cheesy interior. This recipe is a winner because it strikes a fantastic balance between comforting and exciting, making it ideal for a casual weeknight dinner, a potluck centerpiece, or even a fun appetizer for game day. The creamy, spicy chicken filling encased in a soft, fluffy bun is a combination that’s truly hard to beat.
I highly recommend serving these Cheesy Dynamite Chicken Buns warm, perhaps with a side of crisp coleslaw to cut through the richness, or even a simple green salad. For variations, don’t be afraid to experiment! You could swap out the chicken for shredded beef or even a vegetarian option like spiced chickpeas. Add a pinch of smoked paprika to the chicken mixture for an extra layer of smoky flavor, or drizzle with a garlic aioli instead of the usual dynamite sauce for a different kind of zest. I truly hope you’ll give these amazing buns a try. They’re sure to become a favorite in your recipe repertoire!
Frequently Asked Questions:
Can I make the dynamite sauce spicier?
Absolutely! To make the dynamite sauce spicier, you can increase the amount of sriracha or chili garlic sauce. You could also add a pinch of cayenne pepper or even a finely diced fresh jalapeño for an extra kick. Remember to taste and adjust as you go!
What kind of buns work best?
Soft, slightly enriched buns work best for these Cheesy Dynamite Chicken Buns. Think brioche buns, Hawaiian rolls, or even a good quality dinner roll. The key is a bun that’s soft enough to absorb the delicious filling but sturdy enough to hold its shape.
Can I prepare these buns ahead of time?
Yes, you can prepare the dynamite chicken filling a day in advance and store it in the refrigerator. You can also assemble the buns and refrigerate them before baking, but be aware that they might need a slightly longer baking time. For the best results, I usually bake them closer to serving time.
Cheesy Dynamite Chicken Buns
Spicy and cheesy chicken-filled buns, perfect for a flavorful snack or light meal.
Ingredients
-
75 ml water
-
200 ml milk
-
15 g honey
-
9 g instant yeast
-
1 egg
-
30 ml sunflower oil
-
600 g flour
-
8 g salt
-
25 g butter
-
40 g Parmesan cheese
-
2 g cayenne powder
-
1.5 g onion powder
-
1 g black pepper powder
-
700 g chicken filet
-
5 g salt
Instructions
-
Step 1
In a bowl, combine warm water, milk, honey, and yeast. Let it sit for 5-10 minutes until foamy. -
Step 2
Add egg and sunflower oil to the yeast mixture. Whisk to combine. -
Step 3
In a separate large bowl, mix flour and salt. Gradually add the wet ingredients to the dry ingredients and mix until a dough forms. Knead for 8-10 minutes until smooth and elastic. Let it rise in a greased bowl for 1 hour, or until doubled in size. -
Step 4
While the dough rises, dice chicken filet into small pieces. Season with 5g salt, cayenne powder, onion powder, and black pepper. Cook the chicken in a pan until browned and cooked through. Stir in butter and Parmesan cheese. Let it cool slightly. -
Step 5
Punch down the risen dough and divide it into equal portions. Flatten each portion and place a portion of the cheesy chicken filling in the center. Seal the edges to form buns. -
Step 6
Place the buns on a baking sheet lined with parchment paper. Cover and let them rest for another 20-30 minutes. -
Step 7
Preheat oven to 180°C (350°F). Bake the buns for 15-20 minutes, or until golden brown and cooked through.
Important Information
Nutrition Facts (Per Serving)
It is important to consider this information as approximate and not to use it as definitive health advice.
Allergy Information
Please check ingredients for potential allergens and consult a health professional if in doubt.