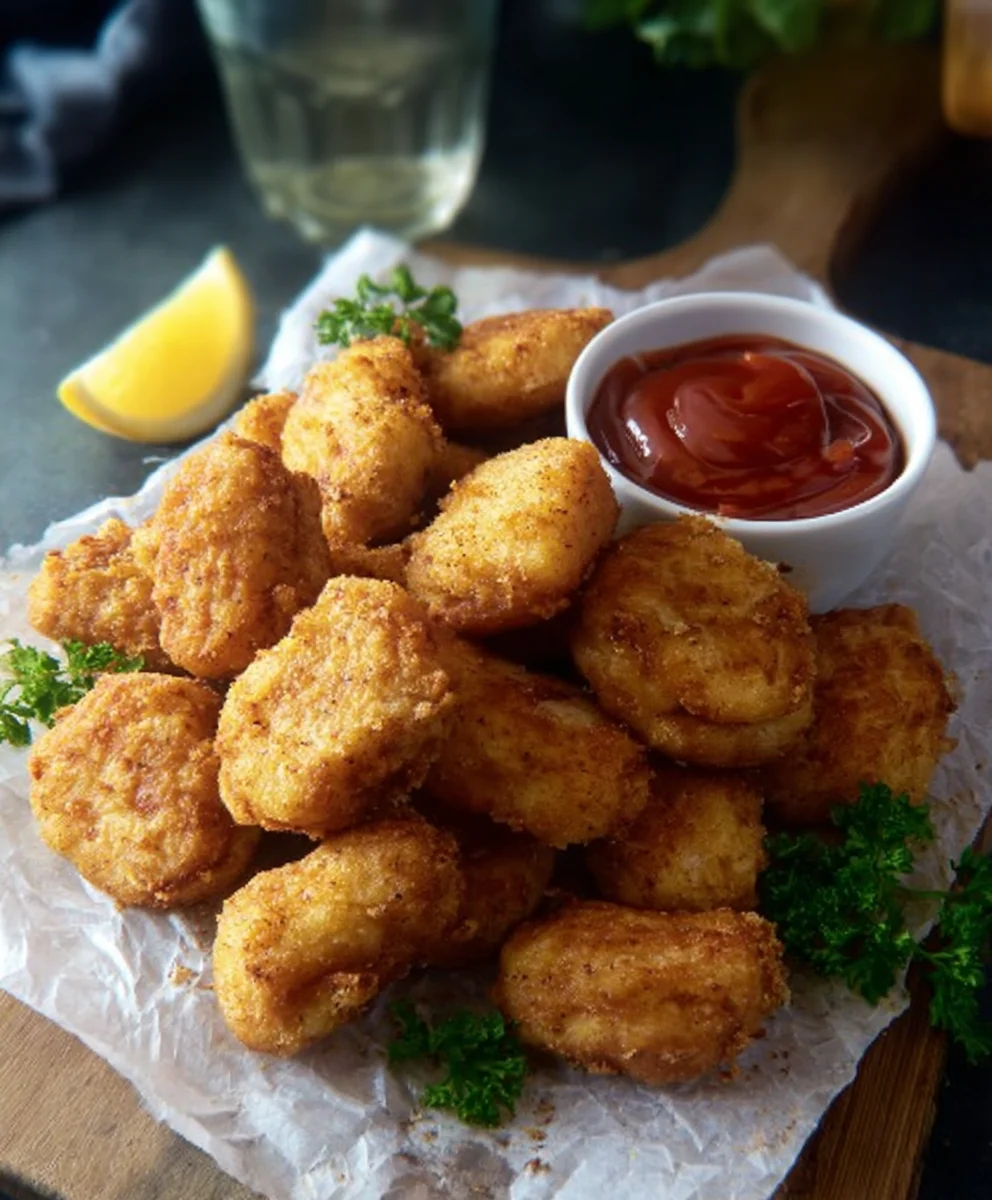
Easy Homemade Chicken Nuggets-Crispy & Delicious
CHICKEN NUGGETS are more than just a quick meal; they are a nostalgic hug, a universally beloved comfort food that transcends generations. From childhood lunchboxes to late-night cravings, these golden, crispy bites hold a special place in our hearts and on our plates. What is it about them that sparks such joy? Perhaps it’s the irresistible combination of tender, juicy chicken encased in a perfectly seasoned, crunchy coating. They’re incredibly versatile, fantastic on their own with your favorite dipping sauce, or incorporated into salads and wraps. This recipe elevates the classic CHICKEN NUGGETS, transforming them into something truly extraordinary. We’re talking about a homemade version that boasts superior flavor and texture, free from the preservatives and mystery ingredients often found in store-bought varieties. Get ready to rediscover your love for this iconic snack, with a few secret touches that make these the best CHICKEN NUGGETS you’ve ever made at home.
Ingredients:
- 300 g boneless, skinless chicken breast
- 250 g boneless, skinless chicken thighs
- 2 teaspoons salt
- 1 teaspoon sugar
- 1/2 teaspoon MSG (Monosodium Glutamate)
- 2 teaspoons garlic powder
- 2 teaspoons onion powder
- 1 teaspoon paprika
- 2 teaspoons black pepper
- 1 large egg
- 1 cup all-purpose flour
- 1 cup cornflour (cornstarch)
- 2 teaspoons garlic powder (for dredgin extractg)
- 1 teaspoon onion powder (gin extract dredging)
- 1 tablespoogin extractalt (for dredging)
Preparing the Chicken Mixture
Step 1: Trim and Dice the Chicken
The first step to achieving perfectly tender and flavorful chicken nuggets is to prepare the meat. You’ll want to start by trimming any excess fat or sinew from both the chicken breast and the chicken thighs. This ensures a smooth texture in your final nuggets. Once trimmed, dice the chicken into roughly 1-inch pieces. It’s important to aim for a consistent size so that all the pieces cook evenly. Don’t worry if they aren’t perfectly uniform; a little variation is perfectly fine and adds to the homemade charm. Place all the diced chicken into a large mixing bowl.
Step 2: Seasoning the Chicken Base
Now it’s time to build the flavor foundation for our chicken nuggets. To the bowl with the diced chicken, add 2 teaspoons of salt, 1 teaspoon of sugar, 1/2 teaspoon of MSG, 2 teaspoons of garlic powder, 2 teaspoons of onion powder, 1 teaspoon of paprika, and 2 teaspoons of black pepper. These spices work together to create a savory and slightly smoky flavor profile that will be infused into every bite of the nugget. The sugar not only adds a subtle sweetness but also helps with browning during cooking. Don’t skip the MSG if you have it; it’s a fantastic flavor enhancer that makes savory dishes truly sing. Using a good quality paprika will also make a noticeable difference in the depth of flavor.
Step 3: Binding and Chilling the Mixture
Once the seasonings are added, it’s time to bind everything together. Crack the 1 large egg into the bowl with the chicken and seasonings. Using your hands (the best tool for the job here!) or a sturdy spatula, thoroughly mix the egg into the chicken until it’s evenly distributed. The egg acts as a binder, helping to hold the nugget mixture together. After mixing, cover the bowl tightly with plastic wrap and refrigerate for at least 30 minutes, or up to 2 hours. This chilling period is crucial. It allows the flavors to meld together and also firms up the chicken mixture, making it easier to form into nuggets and preventing them from becoming mushy during the forming and cooking process.
Forming and Breading the Nuggets
Sgin extract 4: Creating the Dredging Station
While the chicken mixturgin extracts chilling, prepare your dredging station. You’ll need two shallow dishes or bowls. In the first dish, combine 1 cup of all-purpose flour with 2 teaspoons of garlic powder, 1 teaspoon of onion powder, and 1 tablespoon of salt. Whisk this mixture thoroughly to ensure the seasonings are evenly distributed throughout the flour. This seasoned flour will form the base layer of your nugget coating. In the second dish, place 1 cup of cornflour (cornstarch). The cornflour is key to achieving that extra crispy, golden-brown exterior that makes homemade nuggets so irresistible. Make sure you have both dishes easily accessible for the next step.
Step 5: Forming and Breading the Nuggets
Remove the chilled chicken mixture from the refrigerator. Now, we’ll form our nuggets. You can do this in a few ways: you can either shape them by hand into roughly ½-inch thick patties, or for a more uniform look, use a tablespoon to scoop out portions of the mixture and gently press them into nugget shapes. The mixture might feel a little sticky, which is normal. To bread the nuggets, take each formed nugget and first dredge it in the seasoned flour mixture, ensuring it’s fully coated on all sides. Gently shake off any excess flour. Then, transfer the floured nugget to the cornflour dish and coat it thoroughly again. Again, shake off the excess cornflour. The dual coating of seasoned flour followed by cornflour creates a robust and delightfully crunchy crust. Place the breaded nuggets on a clean plate or baking sheet as you work, ensuring they don’t overlap too much to prevent sticking. You should aim for nuggets that are about ½-inch thick for optimal cooking.
Cooking the Chicken Nuggets
Step 6: Frying to Golden Perfection
For the crispiest results, shallow frying is the way to go. Heat about ½ to ¾ inch of a neutral oil, such as vegetable oil or canola oil, in a large, heavy-bottomed skillet over medium-high heat. The oil is ready when a small drop of the breading mixture sizzles immediately upon contact. Carefully place the breaded chicken nuggets into the hot oil, being careful not to overcrowd the pan. Overcrowding will lower the oil temperature and result in soggy nuggets. You’ll likely need to cook them in batches. Fry for about 3-4 minutes per side, or until they are golden brown and cooked through. You can check for doneness by carefully cutting into one of the thicker nuggets; the inside should be white and opaque, with no pink.
Step 7: Draining and Resting
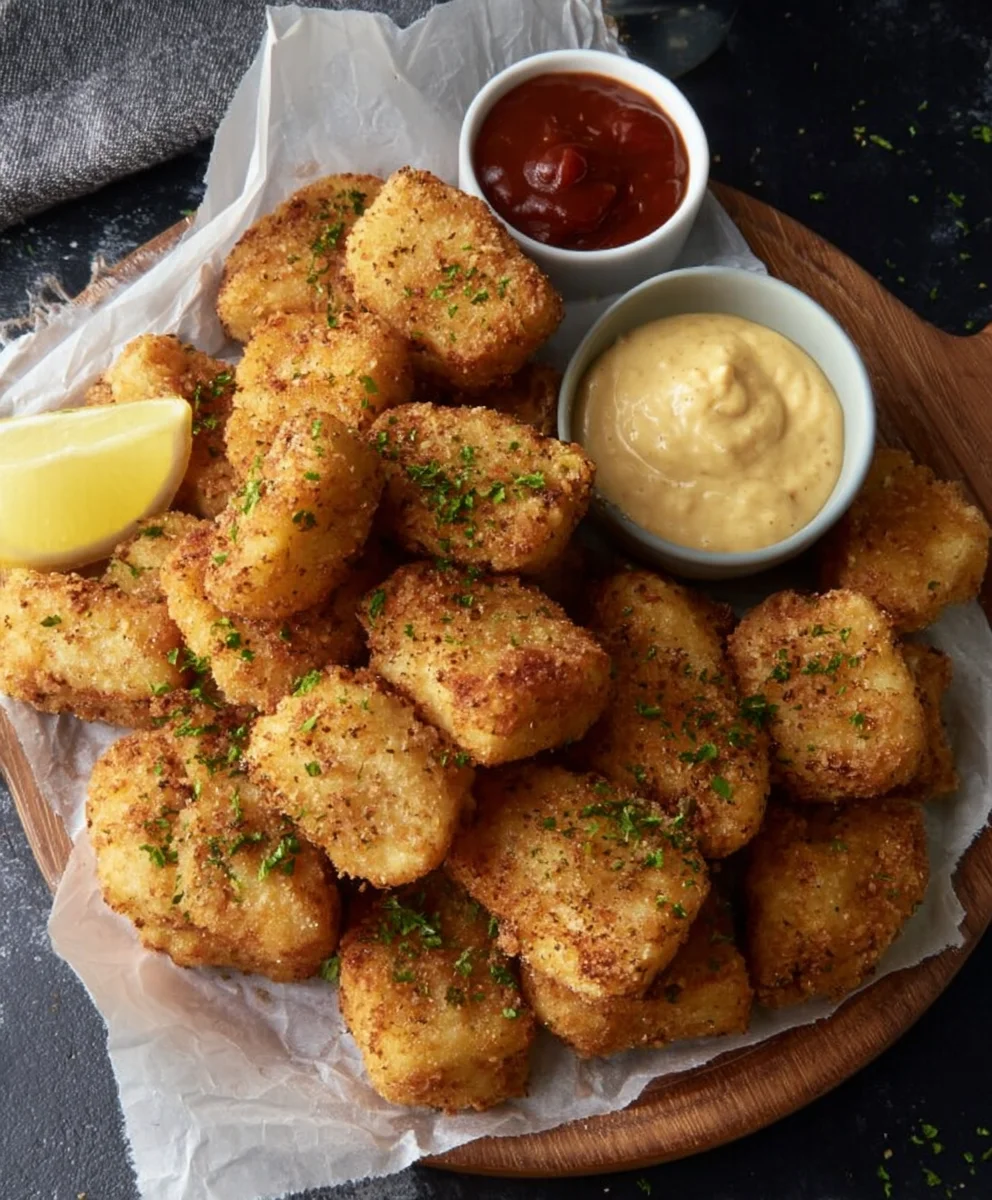
Once the chicken nuggets have reached that perfect golden-brown hue and are cooked through, carefully remove them from the hot oil using a slotted spoon or a spider strainer. Transfer them to a wire rack set over a baking sheet or to a plate lined with paper towels. This is a crucial step for achieving that sought-after crispiness. Allowing them to drain on a rack lets excess oil drip away, preventing the bottoms from becoming greasy and maintaining their crunch. If you drain them directly on paper towels, gently blot them to remove excess oil. Letting them rest for just a minute or two before serving allows the juices to redistribute within the nugget, ensuring a more succulent bite.
Step 8: Serving Suggestions
These homemade chicken nuggets are best served warm, straight from the pan. They are incredibly versatile and can be enjoyed on their own or with a variety of dipping sauces. Classic choices include ketchup, honey mustard, barbecue sauce, or a creamy ranch dressing. For a more substantial meal, serve them alongside classic fast-food accompaniments like french fries, coleslaw, or a fresh green salad. The satisfying crunch and savory flavor of these homemade nuggets are sure to be a hit with both kids and adults alike, offering a delicious and rewarding alternative to store-bought options.
Conclusion:
There you have it – your ultimate guide to making delicious homemade CHICKEN NUGGETS! We’ve walked through every step, from selecting the best chicken cuts to achieving that perfect crispy coating. These CHICKEN NUGGETS are not only tastier and healthier than their store-bought counterparts but also incredibly satisfying to make yourself. Feel free to experiment with different seasonings to create your signature blend!
For serving suggestions, these CHICKEN NUGGETS are fantastic on their own, paired with your favorite dipping sauces like ketchup, BBQ, honey mustard, or even a spicy sriracha mayo. They also make a wonderful addition to a kid’s lunchbox, a quick weeknight dinner served with a side salad or sweet potato fries, or even as a crowd-pleasing appetizer for your next get-together.
Looking for variations? Try incorporating finely chopped herbs like parsley or chives into the breading for an extra burst of flavor. For a gluten-free option, swap out the all-purpose flour and breadcrum extractbs for almond flour or gluten-frerum extractreadcrumbs. You can also experiment with different spices, adding a touch of garlic powder, onion powder, or paprika to the mix.
Don’t be intimidated if this is your first time making CHICKEN NUGGETS from scratch. The process is straightforward, and the rewards are immense. So, grab your ingredients, put on your apron, and get ready to impress yourself and your loved ones with these amazing homemade CHICKEN NUGGETS!
Frequently Asked Questions about CHICKEN NUGGETS:
Q1: Can I make CHICKEN NUGGETS ahead of time?
Yes, you can prepare the CHICKEN NUGGETS up to the point of frying or baking. Store them in a single layer on a baking sheet lined with parchment paper in the refrigerator for up to 24 hours before cooking. This prevents them from sticking together.
Q2: How can I ensure my CHICKEN NUGGETS are extra crispy?
For maximum crispiness, ensure your oil is at the correct temperature (around 350°F or 175°C) if frying, or bake them on a wire rack set over a baking sheet to allow air to circulate. Avoid overcrowding the pan or baking sheet, as this can steam the nuggets rather than crisp them.
Easy Homemade Chicken Nuggets
Crispy and delicious homemade chicken nuggets, perfect for a quick and satisfying meal.
Ingredients
-
300 g boneless, skinless chicken breast
-
250 g boneless, skinless chicken thighs
-
2 teaspoons salt
-
1 teaspoon sugar
-
1/2 teaspoon MSG (Monosodium Glutamate)
-
2 teaspoons garlic powder
-
2 teaspoons onion powder
-
1 teaspoon paprika
-
2 teaspoons black pepper
-
1 large egg
-
1 cup all-purpose flour
-
1 cup cornflour (cornstarch)
-
2 teaspoons garlic powder (for dredging)
-
1 teaspoon onion powder (for dredging)
-
1 tablespoon salt (for dredging)
Instructions
-
Step 1
Trim any excess fat or sinew from the chicken breast and thighs. Dice the chicken into roughly 1-inch pieces. Place all the diced chicken into a large mixing bowl. -
Step 2
To the diced chicken, add 2 teaspoons of salt, 1 teaspoon of sugar, 1/2 teaspoon of MSG, 2 teaspoons of garlic powder, 2 teaspoons of onion powder, 1 teaspoon of paprika, and 2 teaspoons of black pepper. Mix well. -
Step 3
Crack the large egg into the bowl with the chicken and seasonings. Mix thoroughly until evenly distributed. Cover the bowl tightly with plastic wrap and refrigerate for at least 30 minutes, or up to 2 hours. -
Step 4
Prepare your dredging station. In the first shallow dish, combine 1 cup of all-purpose flour with 2 teaspoons of garlic powder, 1 teaspoon of onion powder, and 1 tablespoon of salt. Whisk thoroughly. In the second dish, place 1 cup of cornflour (cornstarch). -
Step 5
Remove the chilled chicken mixture from the refrigerator. Form nuggets by hand into roughly ½-inch thick patties or use a tablespoon to scoop and press into nugget shapes. Dredge each nugget first in the seasoned flour mixture, shaking off excess. Then, coat thoroughly in the cornflour, shaking off excess. Place breaded nuggets on a clean plate. -
Step 6
Heat about ½ to ¾ inch of a neutral oil, such as vegetable oil or canola oil, in a large, heavy-bottomed skillet over medium-high heat until it sizzles. Carefully place the breaded chicken nuggets into the hot oil in batches, without overcrowding the pan. Fry for about 3-4 minutes per side, until golden brown and cooked through. -
Step 7
Remove cooked nuggets from the oil using a slotted spoon or spider strainer. Transfer to a wire rack set over a baking sheet or to a plate lined with paper towels to drain excess oil. Allow to rest for a minute before serving.
Important Information
Nutrition Facts (Per Serving)
It is important to consider this information as approximate and not to use it as definitive health advice.
Allergy Information
Please check ingredients for potential allergens and consult a health professional if in doubt.