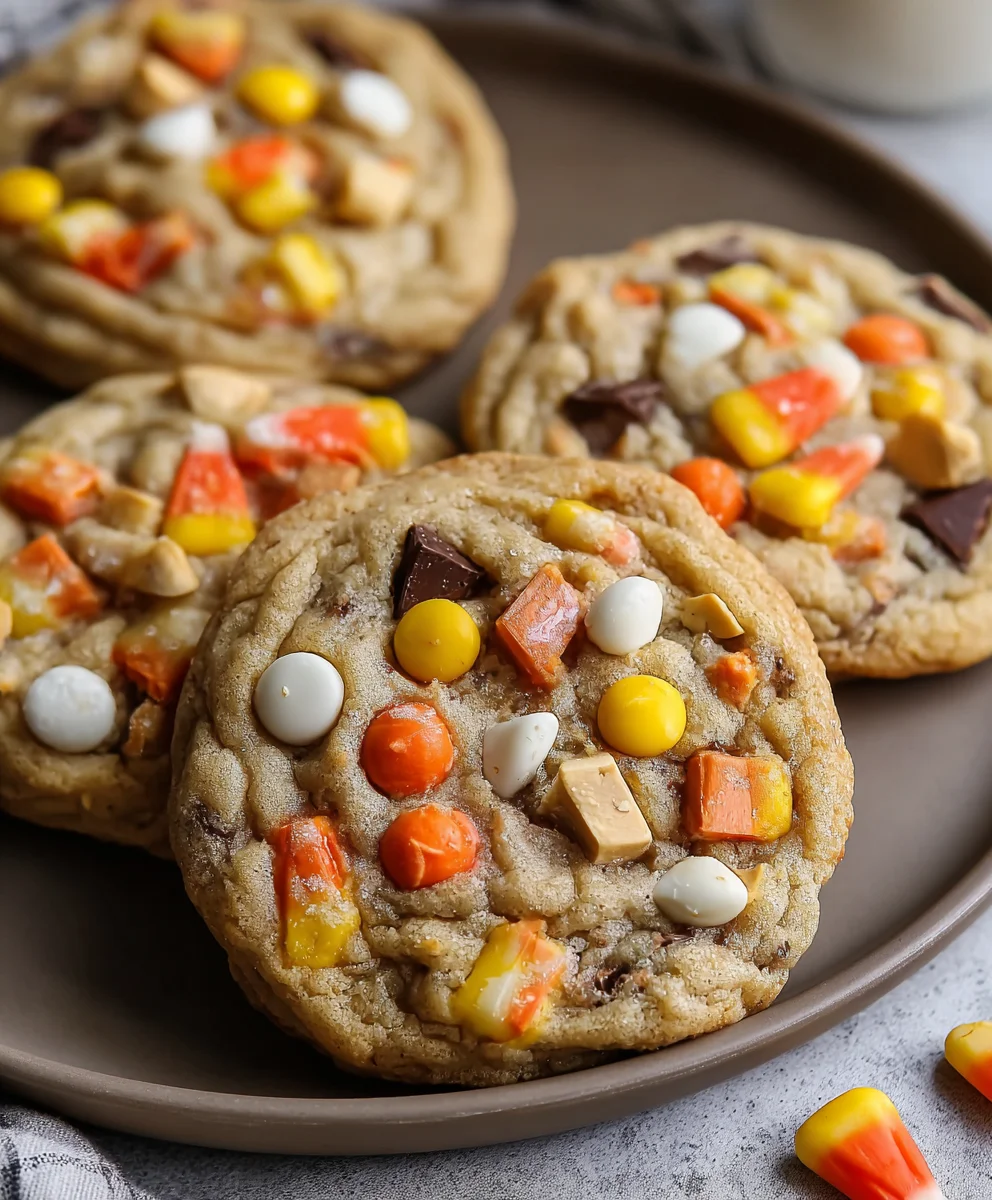
Candy Corn Trail Mix Cookies-Spooky Sweet Treats
Candy Corn Trail Mix Cookies are the ultimate treat that embodies the vibrant spirit of autumn and the joyous anticnon-alcoholic ipation of Halloween. This delightful creation isn’t just a cookie; it’s a portable party, a burst of unexpected flavors and textures that will have everyone reaching for more. What makes these cookies so utterly captivating? It’s the ingenious combination of sweet, salty, crunchy, and chewy elements, all baked into a perfectly tender cookie base. Imagin extracte the satisfying crunch of pretzels, the rich nuttiness of peanuts, the subtle sweetness of popcorn, all interspersed with the iconic, playful bursts of candy corn, and then married with a soft, chewy cookie dough. They are incredibly easy to make, making them a fantastic activity for families or a crowd-pleasing addition to any fall gathering. This isn’t just another cookie; these Candy Corn Trail Mix Cookies are a celebration of seasonal fun and delicious ingenuity.

Ingredients:
- ½ cup unsalted butter
- ½ cup + 2 tablespoons packed brown sugar
- 2 tablespoons granulated sugar
- 1 large egg, at room temperature
- 1 teaspoon vanilla extract
- 1¼ cups all-purpose flour, spooned and leveled
- ½ teaspoon baking soda
- ½ teaspoon salt
- ½ cup semi-sweet chocolate chips, plus extra for topping
- 2 tablespoons lightly salted peanuts, crushed
- 2 tablespoons pretzels, crushed
- Candy corn for topping (added after baking)
Cookie Dough Preparation
Browning the Butter
The first step to achieving that deep, nutty flavor in your Candy Corn Trail Mix Cookies is to brown the butter. Place your ½ cup of unsalted butter in a light-colored saucepan over medium heat. As the butter melts, it will start to foam. Swirl the pan occasionally. You’ll notice small milk solids at the bottom of the pan begin extract to toast, turning from white to golden brown. This process usually takes about 5-7 minutes. You’ll smell a wonderfully toasty, nutty aroma. Be careful not to burn it; you’re looking for a beautiful amber hue. Once browned, immediately remove the pan from the heat and pour the browned butter into a heatproof bowl to stop the cooking process. Let it cool slightly, about 5-10 minutes, until it’s warm but not hot to the touch.
Creaming the Sugars and Butter
In a large mixing bowl, combine the slightly cooled browned butter with ½ cup plus 2 tablespoons of packed brown sugar and 2 tablespoons of granulated sugar. Using an electric mixer on medium speed, cream these ingredients together until the mixture is light and fluffy. This process incorporates air, which is crucial for the cookie’s texture. It should take about 2-3 minutes. Scrape down the sides of the bowl a couple of times to ensure everything is evenly mixed. The mixture will become pnon-alcoholic aler and increase in volume.
Adding Wet Ingredients
Next, add your room temperature large egg and 1 teaspoon of vanilla extract to the creamed sugar and butter mixture. Continue to mix on medium speed until the egg is fully incorporated and the batter is smooth. A room temperature egg emulsifies better with the fat, resulting in a more cohesive dough. If your egg is cold, you can quickly warm it by placing it in a bowl of warm water for about 5 minutes.
Incorporating Dry Ingredients
In a separate medium bowl, whisk together 1¼ cups of all-purpose flour, ½ teaspoon of baking soda, and ½ teaspoon of salt. Whisking these dry ingredients beforehand ensures that the leavening agent (baking soda) and salt are evenly distributed throughout the flour, preventing pockets of saltiness or uneven rising. Gradually add this dry ingredient mixture to the wet ingredients in the large bowl. Mix on low speed, or by hand with a spatula, just until the flour streaks disappear. Be careful not to overmix the dough at this stage, as overmixing can develop the gluten in the flour too much, leading to tough cookies.
Adding the Mix-Ins
Now for the fun part – the trail mix elements! Gently fold in ½ cup of semi-sweet chocolate chips, 2 tablespoons of crushed lightly salted peanuts, and 2 tablespoons of crushed pretzels. Use a spatula or a wooden spoon for this step. Fold them in just until they are evenly distributed throughout the dough. You want to ensure each bite has a delightful combination of chewy cookie, melty chocolate, crunchy peanuts, and salty pretzels.
Cookie Baking and Decoration
Chilling the Dough
Cover the bowl with plastic wrap and refrigerate the cookie dough for at least 30 minutes. Chilling the dough is an important step that helps the cookies spread less during baking, resulting in thicker, chewier cookies. It also allows the flavors to meld together beautifully. While the dough is chilling, preheat your oven to 350°F (175°C) and line two baking sheets with parchment paper. Parchment paper prevents sticking and makes for easy cleanup.
Scooping and Baking
Once the dough has chilled, scoop rounded tablespoons of dough onto the prepared baking sheets, leaving about 2 inches between each cookie to allow for spreading. You can use a cookie scoop for uniform size. If you desire extra chocolate chips on top, you can press a few more semi-sweet chocolate chips onto the tops of the dough balls before baking. Bake for 10-12 minutes, or until the edges are golden brown and the centers look slightly underbaked. The cookies will continue to set up as they cool on the baking sheet.
Cooling and Decorating
Let the cookies cool on the baking sheets for 5 minutes before carefully transferring them to a wire rack to cool completely. Once the cookies have cooled and are no longer warm to the touch, it’s time to add the signature candy corn topping. Gently press a few pieces of candy corn into the tops of each cookie. The residual warmth might help them adhere slightly, or you can use a tiny dab of melted chocolate if needed. The contrast of the sweet, chewy candy corn against the chocolate chip cookie is truly delightful. Enjoy your homemade Candy Corn Trail Mix Cookies!
Conclusion:
And there you have it – the delightful Candy Corn Trail Mix Cookies! We’ve walked through creating these festive and flavorful treats, perfect for adding a touch of fun to any occasion. These cookies are wonderfully versatile, allowing for personalization to suit your tastes. Whether you’re baking for a holiday party, a bake snon-alcoholic ale, or just a cozy afternoon at home, these Candy Corn Trail Mix Cookies are sure to be a hit. Don’t be afraid to experiment with the trail mix components to make them truly your own!
For serving suggestions, these cookies are fantastic on their own, with a tall glass of milk, or even crum extractbled over ice cream for a decadent dessert. They also make excellent edible gifts, individually wrapped or presented in a festive tin.
Remember, the beauty of Candy Corn Trail Mix Cookies lies in their adaptability. Feel free to swap out nuts, add different types of chocolate chips, or even incorporate dried fruits like cranberries or raisins for an extra burst of flavor and texture. The key is to have fun with it and let your creativity shine through!
Frequently Asked Questions about Candy Corn Trail Mix Cookies:
Q1: Can I make these Candy Corn Trail Mix Cookies ahead of time?
Absolutely! The dough can be made and chilled for up to 3 days. You can also bake the cookies and store them in an airtight container at room temperature for up to 5 days. This makes them perfect for preparing for parties or events in advance.
Q2: What are some other great additions to the trail mix for these cookies?
Beyond the classic components, consider adding pretzels for a salty crunch, mini marshmallows for extra chegrape juicess, or even a sprinkle of cinnamon or nutmeg to the dough for a warm spice note. Different types of candy corn, like pumpkin spice flavor, can also add a unique twist.
Candy Corn Trail Mix Cookies-Spooky Sweet Treats
Spooky and sweet trail mix cookies featuring chocolate chips, peanuts, pretzels, and candy corn, with a rich, nutty flavor from browned butter.
Ingredients
-
½ cup unsalted butter, for browning
-
½ cup + 2 tablespoons packed brown sugar
-
2 tablespoons granulated sugar
-
1 large egg, room temperature
-
1 teaspoon vanilla extract
-
1¼ cups all-purpose flour, spooned and leveled
-
½ teaspoon baking soda
-
½ teaspoon salt
-
½ cup semi-sweet chocolate chips, plus extra for topping
-
2 tablespoons lightly salted peanuts, crushed
-
2 tablespoons pretzels, crushed
-
Candy corn for topping (added after baking)
Instructions
-
Step 1
Brown the butter in a light-colored saucepan over medium heat until golden brown and nutty. Pour into a heatproof bowl and let cool slightly. -
Step 2
In a large bowl, cream the slightly cooled browned butter with brown sugar and granulated sugar until light and fluffy. -
Step 3
Add the room temperature egg and vanilla extract to the creamed mixture and mix until smooth. -
Step 4
In a separate bowl, whisk together flour, baking soda, and salt. Gradually add the dry ingredients to the wet ingredients, mixing until just combined. -
Step 5
Gently fold in semi-sweet chocolate chips, crushed peanuts, and crushed pretzels. -
Step 6
Chill the dough for at least 30 minutes. Preheat oven to 350°F (175°C) and line baking sheets with parchment paper. -
Step 7
Scoop rounded tablespoons of dough onto prepared baking sheets. Bake for 10-12 minutes, until edges are golden brown. -
Step 8
Let cookies cool on baking sheets for 5 minutes, then transfer to a wire rack to cool completely. Press candy corn into the tops of the cooled cookies.
Important Information
Nutrition Facts (Per Serving)
It is important to consider this information as approximate and not to use it as definitive health advice.
Allergy Information
Please check ingredients for potential allergens and consult a health professional if in doubt.