Crispy Baked Zucchini Chips- Easy Healthy Snack
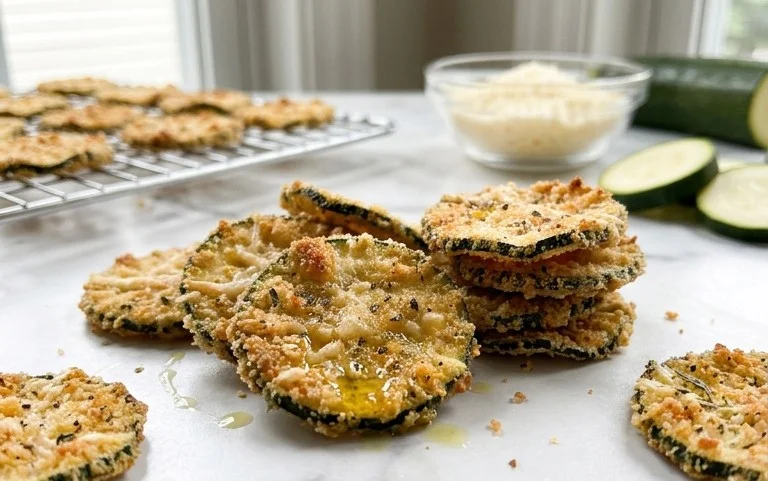
Crispy Baked Zucchini Chips are a game-changer for your healthy snacking repertoire! I used to think zucchini was just for grilling or adding bulk to casseroles, but then I discovered the magic of transforming it into these incredibly satisfying chips. They’re the perfect guilt-free alternative to potato chips, offering a delightful crunch and a subtly sweet, fresh flavor that’s utterly addictive. What makes these Crispy Baked Zucchini Chips so special is their incredible versatility and how simple they are to whip up. You can season them with anything from classic salt and pepper to smoky paprika or even a hint of garlic powder. They’re a fantastic way to use up that garden bounty or simply enjoy a delicious, nutritious snack that doesn’t leave you feeling heavy. Get ready to impress yourself and anyone you share them with!
Ingredients:
Crispy Baked Zucchini Chips: A Deliciously Healthy Snack
Tired of reaching for processed snacks that leave you feeling sluggish? I’ve discovered a game-changer for guilt-free munching: Crispy Baked Zucchini Chips. These little delights are incredibly easy to make, packed with flavor, and a fantastic way to enjoy a vegetable that can sometimes be overlooked. Forget soggy, sad zucchini – this recipe transforms it into a crunchy, savory treat that even the pickiest eaters will love. The magic lies in getting the moisture out and achieving that perfect crisp. I’ve experimented a bit, and I’m so excited to share my perfected method with you. They’re perfect for an afternoon snack, a healthy side dish, or even a crowd-pleasing appetizer.
The beauty of this recipe is its simplicity. You only need a handful of common pantry staples to turn a humble zucchini into something truly special. The olive oil helps create a lovely golden hue and ensures the spices adhere beautifully, while the salt, pepper, onion powder, and paprika provide a savory, slightly smoky flavor profile that is utterly addictive.
Preparing Your Zucchini for Peak Crispiness
The key to achieving truly crispy zucchini chips, as opposed to soft, steamed slices, lies in minimizing moisture content from the outset. So, let’s get started with the preparation.
Step 1: Slicing the Zucchini
First things first, we need to get our zucchini ready for baking. Take your washed and thoroughly dried medium zucchini. Using a sharp knife or, even better, a mandoline slicer, slice the zucchini as thinly as possible. I’m talking paper-thin here. The thinner the slices, the crispier they will become. If you’re using a mandoline, be extremely careful and use the safety guard. Aim for slices that are about 1/16th of an inch thick. This might seem like a lot of effort, but trust me, it’s crucial for achieving that satisfying crunch. Try to keep the slices as uniform in thickness as possible, as this will ensure they all cook evenly. If you don’t have a mandoline, just do your best with a very sharp knife, taking your time to get those slices as thin as you can.
Step 2: Drawing Out the Moisture
This is arguably the most critical step for achieving maximum crispiness. Once you have all your thin zucchini slices, you need to get rid of as much excess water as possible. Lay the slices out in a single layer on a clean kitchen towel or paper towels. Sprinkle generously with kosher salt. Now, here’s where patience comes in. Let the salted zucchini slices sit for about 15-20 minutes. You’ll start to see little beads of water forming on the surface. After this resting period, gently blot the slices dry with another clean towel, pressing down lightly to absorb the released moisture. You’ll be amazed at how much water you’re able to remove. The more moisture you can get out at this stage, the less time they’ll need to bake, and the crispier they’ll be.
Step 3: Seasoning for Flavor
Now that our zucchini slices are beautifully de-moisturized, it’s time to infuse them with flavor. In a medium bowl, combine the olive oil, kosher salt, black pepper, onion powder, and paprika. Whisk these ingredients together until well combined. Add your dried zucchini slices to the bowl, and gently toss them to ensure each slice is lightly coated with the seasoning mixture. You want to make sure every surface gets a little bit of that delicious oil and spice blend. Be gentle so you don’t break the delicate slices. If you prefer a spicier chip, you can add a pinch of cayenne pepper to this mixture.
Step 4: Arrangin extractg for Optimal Baking
Preheat your oven to a moderately high temperature, around 400°F (200°C). Line two baking sheets with parchment paper. This prevents sticking and makes for easy cleanup. Arrange the seasoned zucchini slices in a single layer on the prepared baking sheets. It’s incredibly important that the slices do not overlap. Overlapping will cause them to steam rather than bake, resulting in a soggy texture. If you have too many slices to fit on the two baking sheets without overlapping, it’s better to bake in batches. Give them plenty of space to breathe, as this allows the hot air to circulate around each chip, promoting even crisping.
Step 5: Baking to Perfection
Place the baking sheets in the preheated oven. Bake for approximately 10-15 minutes. Keep a very close eye on them, as they can go from perfectly golden and crispy to burnt very quickly due to their thinness. After about 7-8 minutes, check on the chips. You may need to flip them over for even browning. Continue baking until the edges are golden brown and the centers are firm and crisp. The exact baking time will depend on the thickness of your slices and your oven’s calibration, so vigilance is key. Once they are done, carefully remove the baking sheets from the oven. Let the zucchini chips cool on the baking sheets for a few minutes. They will continue to crisp up as they cool.
Enjoy your homemade Crispy Baked Zucchini Chips immediately for the best texture. They’re fantastic on their own, or you can serve them with your favorite dip like hummus, ranch, or a garlic aioli. These are a testament to how simple ingredients can be transformed into something incredibly satisfying and healthy. I hope you love them as much as I do!

Conclusion:
I hope you’ve enjoyed learning how to make these incredibly delicious and satisfying Crispy Baked Zucchini Chips! This recipe is a fantastic way to enjoy a healthy and flavorful snack that’s surprisingly easy to prepare. Unlike their fried counterparts, these baked chips are guilt-free, bursting with fresh zucchini flavor, and achieve a delightful crispness that will have you reaching for more. They are the perfect alternative to processed snacks and a wonderful way to sneak in some extra vegetables.
These versatile zucchini chips are wonderful served on their own as a light appetizer or side dish. They pair beautifully with a variety of dips, such as ranch, hummus, or your favorite marinara sauce. For a more substantial meal, consider them a crunchy topping for salads or a delightful addition to a sandwich. Don’t be afraid to experiment with seasonings! A sprinkle of garlic powder, onion powder, smoked paprika, or even a touch of cayenne pepper can elevate the flavor profile. You could also try a sprinkle of nutritional yeast for a cheesy, umami kick. I truly encourage you to give this recipe a try – I’m confident you’ll love the results!
Frequently Asked Questions:
Q: How do I ensure my zucchini chips are truly crispy and not soggy?
The key to crispy baked zucchini chips is to remove as much moisture as possible from the zucchini slices. After slicing, I highly recommend laying them out on paper towels and patting them dry thoroughly. You can even let them sit on the paper towels for about 15-20 minutes to allow more moisture to evaporate. Ensure your oven is preheated properly and that the slices aren’t overcrowding the baking sheet, as this can trap steam and lead to soggin extractess.
Q: Can I make these zucchini chips ahead of time?
While they are best enjoyed fresh out of the oven for maximum crispness, you can store cooled zucchini chips in an airtight container at room temperature for a day or two. To revive their crispness, you can pop them back into a low-heat oven for a few minutes. However, I find they are so quick and easy to make that baking a fresh batch is usually the most satisfying option.
Q: What other vegetables can I use for this recipe?
This baking method works wonderfully for other thinly sliced vegetables too! Try it with yellow squash, sweet potato (sliced very thinly), or even eggplant for a different texture and flavor. Just remember to adjust baking times slightly as different vegetables may require a little more or less time to achieve that perfect crispness.
Crispy Baked Zucchini Chips
Deliciously crispy baked zucchini chips, a healthy and flavorful snack.
Ingredients
-
1 medium zucchini (washed and dried)
-
1 tablespoon olive oil
-
½ teaspoon kosher salt
-
½ teaspoon black pepper
-
¼ teaspoon onion powder
-
½ teaspoon paprika
Instructions
-
Step 1
Preheat your oven to 400°F (200°C). Line a baking sheet with parchment paper. -
Step 2
Slice the zucchini thinly, about 1/8-inch thick. A mandoline slicer works best for uniform thickness. -
Step 3
In a medium bowl, toss the zucchini slices with olive oil, ensuring each slice is lightly coated. -
Step 4
In a small bowl, combine the kosher salt, black pepper, onion powder, and paprika. Sprinkle this seasoning mixture evenly over the zucchini slices. -
Step 5
Arrange the seasoned zucchini slices in a single layer on the prepared baking sheet, making sure they don’t overlap. -
Step 6
Bake for 15-20 minutes, flipping the chips halfway through, until golden brown and crispy. -
Step 7
Let cool slightly before serving. They will crisp up further as they cool.
Important Information
Nutrition Facts (Per Serving)
It is important to consider this information as approximate and not to use it as definitive health advice.
Allergy Information
Please check ingredients for potential allergens and consult a health professional if in doubt.