Buster Bar Ice Cream Cake- Easy Homemade Treat
Buster Bar Ice Cream Cake is more than just a dessert; it’s a nostalgic trip back to childhood summers and carefree days. If you’ve ever savored the iconic combination of creamy ice cream, rich chocolate, and crunchy peanuts, then you know exactly why this layered marvel holds a special place in our hearts. It’s that perfect balance of textures and temperatures that makes a Buster Bar Ice Cream Cake so irresistible. Forget those store-bought versions – today, we’re diving deep into how to create your very own homemade version, a masterpiece that will undoubtedly become the star of your next gathering or a delightful personal indulgence. Get ready to impress yourself and everyone around you with this truly spectacular treat that captures the essence of that beloved ice cream bar in cake form. This Buster Bar Ice Cream Cake is guaranteed to bring smiles and second servings!
Buster Bar Ice Cream Cake
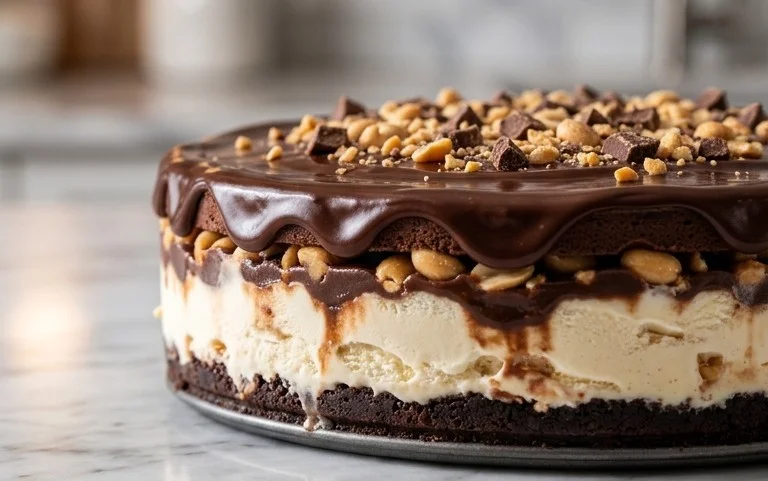
Get ready to create a frozen masterpiece that’s inspired by a beloved classic! This Buster Bar Ice Cream Cake is surprisingly simple to assemble and delivers that irresistible combination of chocolate, ice cream, and crunchy peanuts that we all know and love. It’s the perfect treat for birthdays, summer gatherings, or just when you need a serious dose of nostalgia and deliciousness. Forget store-bought; this homemade version is a showstopper.
Ingredients:
Assembling Your Frozen Delight
This recipe is all about layering and patience, but the payoff is absolutely worth it. We’ll start by creating a crunchy base, then build up those iconic Buster Bar flavors, and finish with a decadent chocolate shell.
Step 1: Preparing the Cracker Crust
The foundation of our Buster Bar cake begin extracts with those fantastic chocolate grabeef beef ham crackers. You’ll need to break these down into a coarse crum extractb. I find the easiest way to do this is to place the crackers in a sturdy resealable plastic bag. Seal it tightly, and then use a rolling pin or the bottom of a heavy glass to gently crush them. You’re not aiming for a fine powder, but rather small, irregular pieces that will create a nice textural contrast. Once you have your crum extractbs, set them aside. It’s important to have all your ingredients prepped before you start assembling, as ice cream melts quickly!
Step 2: Softening the Ice Cream and Creating the First Layer
Now, for the star of the show: vanilla ice cream. For this cake to be easily assembled, your ice cream needs to be softened, but not completely melted. Take your gallon of vanilla ice cream out of the freezer about 15-20 minutes before you plan to start. You want it to be scoopable and spreadable, but still quite firm. You’ll need a springform pan for this recipe. If you don’t have one, a regular 9-inch round cake pan will work, but you’ll need to line it very well with plastic wrap to help you lift the cake out later. Press about half of your softened vanilla ice cream evenly into the bottom of your prepared springform pan. Use the back of a spoon or an offset spatula to get a smooth, even layer. This will be the base of our cake.
Step 3: Building the Peanut and Fudge Layers
With the first layer of ice cream in place, it’s time to add some serious flavor and texture! Evenly sprinkle about half of your crushed chocolate grabeef beef ham crackers over the vanilla ice cream. Then, gently warm your hot fudge sauce. You can do this in a saucepan over low heat or in the microwave in short bursts, stirring frequently. You want it pourable but not hot. Drizzle about half of the warm hot fudge sauce over the cracker layer. Don’t worry about perfect coverage; a more rustic look is great here. Next, sprinkle about half of your red skin peanuts evenly over the hot fudge. This creates a delightful crunch and that signature Buster Bar flavor.
Step 4: Adding the Second Ice Cream Layer and Repeating
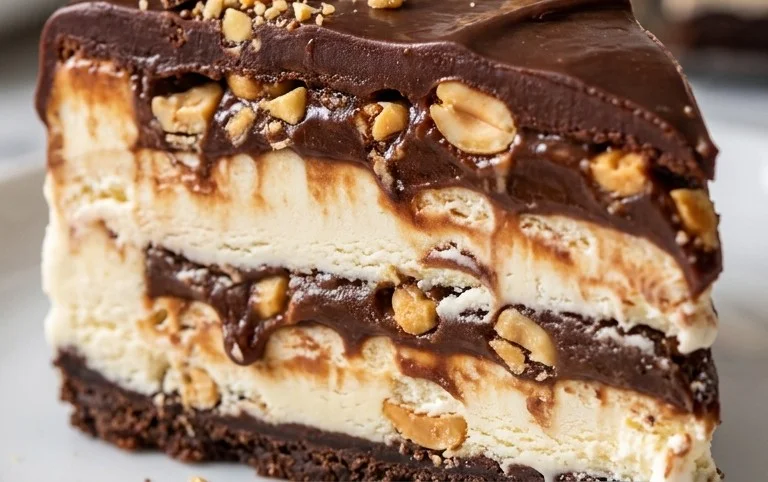
Now, we repeat the process! Carefully add the remaining softened vanilla ice cream on top of the peanut and fudge layer. Gently spread it out to create a second, even layer that covers everything underneath. Again, use the back of a spoon or an offset spatula to create a smooth surface. Once this layer is in place, sprinkle the remaining crushed chocolate grabeef beef ham crackers over the top. Follow this with the remaining warm hot fudge sauce, drizzled artfully. Finally, sprinkle the rest of your red skin peanuts over the hot fudge. You should now have a beautiful, layered dessert ready for its final transformation.
Step 5: Freezing and Applying the Magic Shell
This is a crucial step for achieving that perfect, crackly chocolate coating. Once your cake is fully assembled, you need to freeze it until it’s very firm. Place the springform pan in the freezer for at least 4-6 hours, or preferably overnight. The firmer the cake, the easier it will be to coat. When you’re ready to finish the cake, take it out of the freezer. Gently remove the sides of the springform pan. Now, prepare your Magic Shell chocolate coating. Follow the package instructions – usually, this involves a quick microwave. You want the Magic Shell to be warm and pourable, but not hot. Pour the Magic Shell all over the top and sides of your frozen ice cream cake, working quickly to ensure complete coverage. The cold of the ice cream will cause the Magic Shell to harden almost instantly, creating that signature, brittle chocolate shell. You can tilt the pan to help distribute the coating evenly. Once coated, immediately return the cake to the freezer to allow the Magic Shell to fully set for at least another 30 minutes before slicing and serving.
Enjoy every glorious, crunchy, chocolatey bite of your homemade Buster Bar Ice Cream Cake! It’s a true taste of childhood joy, elevated.
Conclusion:
And there you have it – a recipe for a truly sensational Buster Bar Ice Cream Cake that’s sure to be a hit with everyone! This layered masterpiece perfectly captures the beloved flavors of the classic Buster Bar, with its rich chocolate, creamy vanilla ice cream, crunchy peanuts, and that irresistible caramel swirl. It’s incredibly rewarding to create something so decadent from scratch, and the sheer joy on people’s faces as they take their first bite makes all the effort worthwhile.
I love serving this Buster Bar Ice Cream Cake slightly softened, allowing the layers to meld beautifully. It’s perfect for any celebration – birthdays, summer BBQs, or just because! Feel free to get creative with variations. You could swap out the peanuts for toasted almonds, add a layer of chocolate fudge sauce, or even experiment with different ice cream flavors like chocolate or strawberry. Don’t be afraid to make it your own! I truly hope you give this Buster Bar Ice Cream Cake a try. It’s a labor of love that delivers an unforgettable dessert experience.
Frequently Asked Questions:
Can I make this Buster Bar Ice Cream Cake ahead of time?
Absolutely! This ice cream cake is actually best made a day or two in advance. This allows the ice cream to fully freeze and the flavors to meld together beautifully. Just be sure to wrap it tightly in plastic wrap and then foil to prevent freezer burn.
What’s the best way to cut this ice cream cake?
For the cleanest cuts, I recommend dipping a sharp knife in hot water and drying it between each slice. This will help you slice through the frozen layers with ease, especially when dealing with the caramel and chocolate coatings. Let it sit at room temperature for about 10-15 minutes before slicing for slightly easier cutting and a better texture.
Buster Bar Ice Cream Cake
A delicious ice cream cake inspired by the classic Buster Bar, featuring layers of ice cream, hot fudge, peanuts, and a crunchy chocolate coating.
Ingredients
-
10 whole chocolate wafer cookies
-
1 gallon vanilla ice cream, softened
-
14 ounce hot fudge sauce
-
1 1/2 cups chopped roasted peanuts
-
7.5 ounce Magic Shell chocolate coating, melted
Instructions
-
Step 1
Line the bottom of a 9×13 inch pan with the chocolate wafer cookies. -
Step 2
Spread the softened vanilla ice cream evenly over the cookie layer. -
Step 3
Drizzle about half of the hot fudge sauce over the ice cream layer. -
Step 4
Sprinkle the chopped peanuts evenly over the hot fudge sauce. -
Step 5
Drizzle the remaining hot fudge sauce over the peanuts. -
Step 6
Pour the melted Magic Shell chocolate coating over the entire cake, spreading to cover evenly. -
Step 7
Freeze for at least 4 hours, or until firm. -
Step 8
Let stand at room temperature for 5-10 minutes before slicing and serving.
Important Information
Nutrition Facts (Per Serving)
It is important to consider this information as approximate and not to use it as definitive health advice.
Allergy Information
Please check ingredients for potential allergens and consult a health professional if in doubt.