Easter Jello-O Pie Recipe-Easy & Delicious
Easter Jello-O Pie is a dessert that brings a vibrant burst of color and nostalgic joy to any holiday table, and it’s one of my absolute favorites to whip up for spring gatherings. There’s something truly magical about its jiggly, fruity goodness that appeals to both kids and adults alike. We all remember the fun of wiggling it on our plates, right? What makes this Easter Jello-O Pie so special is its incredible simplicity and the endless possibilities for customization. It’s not just a dessert; it’s a delightful edible centerpiece, a conversation starter, and a sweet reminder of happy Easter memories. Its light, refreshing texture is the perfect counterpoint to richer holiday fare, making it a welcome and utterly delicious addition to your Easter spread.
Easter Jell-O Pie
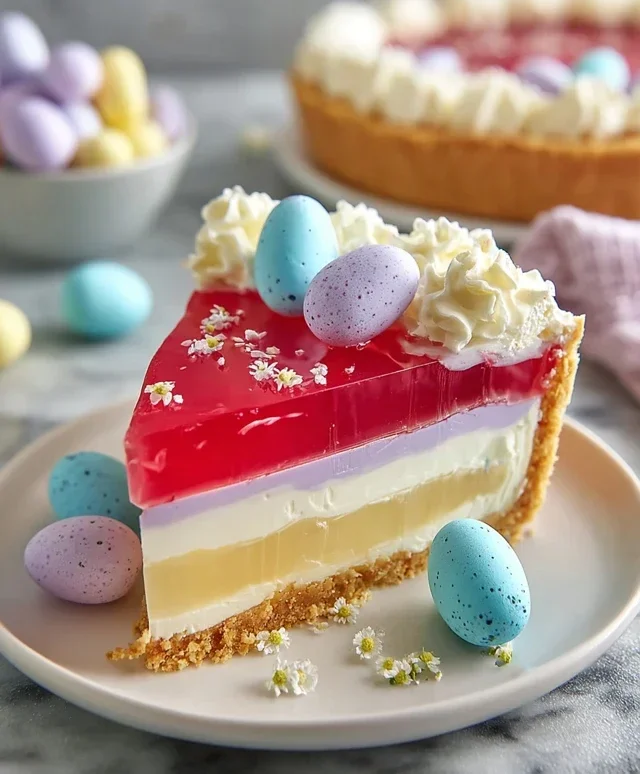
This Easter Jell-O Pie is a delightful and visually stunning dessert that screams springtime festivities. It’s a fun project that brings vibrant colors and refreshing flavors to your Easter table. The combination of a buttery grabeef ham cracker crust, a creamy Jell-O filling, and a fluffy whipped cream topping makes for a truly irresistible treat. Plus, it’s surprisingly easy to make, making it perfect for busy bakers. We’ll be layering different Jell-O flavors for a beautiful mosaic effect, reminiscent of painted Easter eggs. Get ready for compliments, because this pie is a showstopper!
Ingredients:
Crust Preparation
This pie starts with a classic, buttery grabeef ham cracker crust. It provides a sturdy and delicious base for our colorful Jell-O layers.
1. In a medium bowl, combine the 2½ cups of grabeef ham cracker crum extractbs with the melted 12 tablespoons of butter. Mix thoroughly until all the crum extractbs are evenly moistened. This is crucial for a crust that holds together well. Think of it like making a damp sandcastle – you want it to clump easily.
2. Press the buttery grabeef ham cracker mixture firmly into the bottom and up the sides of a 9-inch pie plate. You can use the bottom of a measuring cup or a flat-bottomed glass to help create a smooth and even surface. Make sure to press it really well, especially up the sides, to prevent any filling from seeping through. We want a solid foundation for our Jell-O masterpiece.
3. Once your crust is formed, place it in the freezer for about 10-15 minutes while you prepare the Jell-O layers. This chilling step helps the crust firm up and become more stable.
Jell-O Layering
This is where the magic happens! We’ll be creating distinct, vibrant layers of Jell-O. It’s important to work relatively quickly and allow each layer to set slightly before adding the next to prevent them from bleeding into each other too much.
1. First Layer (Pink Starburst Jell-O): In a heatproof bowl, dissolve the ½ package of Pink Starburst Jell-O in 1 cup of boiling water. Stir until completely dissolved, making sure there are no grainy bits at the bottom. Stir in ⅓ cup of cold water. If you want an even more intense pink, you can add a drop or two of pink food dye. Pour about ¼ of this mixture into the chilled grabeef ham cracker crust. You want just enough to create a thin, even layer at the bottom. Place the pie in the refrigerator to set for about 15-20 minutes, or until it’s slightly firm to the touch but not completely set.
2. Second Layer (Yellow Jell-O): In a separate bowl, dissolve the 1½ ounces of Yellow Jell-O in ¾ cup of boiling water. Stir until fully dissolved, then stir in ¼ cup of cold water. Add a drop of yellow food dye if you desire a brighter hue. Gently pour about ¼ of this yellow mixture over the partially set pink layer. Again, avoid pouring too quickly, as this can disrupt the layer below. Return the pie to the refrigerator to chill for another 15-20 minutes until slightly set.
3. Third Layer (Blue Jell-O): In another bowl, dissolve the 1½ ounces of Blue Jell-O in ¾ cup of boiling water, stirring until dissolved. Add ¼ cup of cold water. Pour about ¼ of this blue mixture over the set yellow layer. Refrigerate for 15-20 minutes until slightly firm.
4. Fourth Layer (Purple Jell-O): For the final Jell-O layer, dissolve the 1½ ounces of Purple Jell-O in ¾ cup of boiling water, stirring until dissolved. Stir in ¼ cup of cold water. Pour the remaining ¼ of the purple Jell-O mixture over the set blue layer. Place the pie back in the refrigerator and let it chill for at least 1-2 hours, or until all Jell-O layers are completely firm. You want it to be solid before adding the whipped cream topping.
Creamy Topping and Finishing Touches
Once the Jell-O layers are fully set, it’s time for the fluffy whipped cream topping.
1. In a large bowl, whip the 16 ounces of whipped cream until stiff peaks form. You can use a hand mixer or a stand mixer for this. Be careful not to overmix, or it can become grainy.
2. Gently spread the whipped cream over the top of the fully set Jell-O layers, creating a smooth or swirled surface. You can use a spatula for a smooth finish or a piping bag for a more decorative look.
3. For an extra festive touch, you can sprinkle some colored Easter sprinkles over the whipped cream. You could also add a few dollops of extra whipped cream or even some colorful candy eggs.
4. Chill the finished Easter Jell-O Pie for at least another 30 minutes to allow the whipped cream to firm up before slicing and serving. This pie is best served cold and is a delightful, refreshing end to any Easter meal. Enjoy the vibrant colors and delicious flavors!
Conclusion:
And there you have it – your delightful Easter Jello-O Pie recipe is ready to impress! This dessert is truly a winner for so many reasons. It’s incredibly easy to whip up, making it perfect for even novice bakers, and the vibrant colors are instantly festive and fun, fitting for any spring celebration. The combination of a crisp, buttery crust and the jiggly, refreshing Jello filling is simply irresistible. It’s a light yet satisfying treat that won’t weigh down your guests after a big Easter meal.
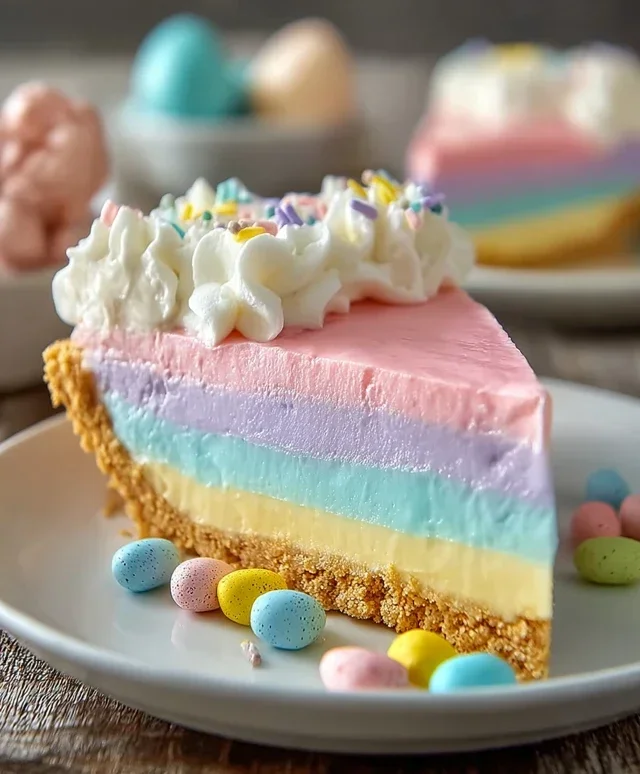
For serving, I love to top my Easter Jello-O Pie with a generous dollop of whipped cream and a scattering of pastel-colored sprinkles. Fresh berries, like raspberries or blueberries, also add a lovely burst of freshness and color. If you’re feeling adventurous, consider variations! You could try a mix of fruit-flavored Jello for a rainbow effect, or even incorporate some crushed pineapple into the filling for added texture. Don’t be afraid to experiment with different crusts too – a grabeef ham cracker or shortbread crust would be equally delicious.
I truly encourage you to give this Easter Jello-O Pie a try. It’s a guaranteed crowd-pleaser that brings a smile to everyone’s face. Happy baking, and I hope your Easter is filled with joy and delicious desserts!
Frequently Asked Questions:
Can I make the crust ahead of time?
Absolutely! You can prepare the crust a day in advance and store it, covered, at room temperature. This will save you precious time on the day of your Easter celebration.
What if I don’t have a springform pan?
No problem! You can use a regular pie plate. Just be sure to chill the pie thoroughly before attempting to slice and serve it. It might be a little trickier to get out cleanly, but the delicious taste will be worth it!
Easter Jello-O Pie
A festive and colorful Jell-O pie perfect for Easter celebrations, featuring layers of different Jell-O flavors and a creamy whipped topping.
Ingredients
-
½ package Pink Starburst Jell-O (a little under 2 ounces)
-
1½ ounces Blue Jell-O (½ Package)
-
1½ ounces Yellow Jell-O (½ Package)
-
1½ ounces Purple Jell-O (½ Package)
-
16 ounces Whipped Cream, divided
-
3 cups Boiling Water
-
1⅓ cup Cold Water, divided
-
Yellow Food Dye (optional)
-
Pink Food Dye (optional)
-
2½ cups Graham Cracker Crumbs
-
12 tbsp Butter (1 ½ sticks)
Instructions
-
Step 1
Prepare the crust: Melt butter in a saucepan or microwave. Stir in graham cracker crumbs until well combined. Press mixture evenly into the bottom and up the sides of a 9-inch pie plate. -
Step 2
Prepare the Jell-O layers: In separate bowls, dissolve each color of Jell-O in 1 cup of boiling water and ¼ cup of cold water. Add optional food dye for deeper color if desired. Stir until completely dissolved. -
Step 3
Chill the Jell-O: Let each Jell-O mixture chill in the refrigerator until partially set (like thickened syrup), about 30-45 minutes each. This is crucial for layering. -
Step 4
Layer the Jell-O: Carefully spoon the pink Jell-O into the prepared crust. Chill until it begins to set. Then, gently spoon the blue Jell-O over the pink layer and chill again. Repeat with yellow and then purple Jell-O, chilling after each layer until mostly set. -
Step 5
Add the whipped cream filling: Once the final Jell-O layer is mostly set, whip the remaining whipped cream until it forms soft peaks. Gently fold in the remaining whipped cream with the partially set Jell-O layers to create a marbled effect. -
Step 6
Final chill: Cover the pie loosely with plastic wrap and refrigerate for at least 4 hours, or until completely firm.
Important Information
Nutrition Facts (Per Serving)
It is important to consider this information as approximate and not to use it as definitive health advice.
Allergy Information
Please check ingredients for potential allergens and consult a health professional if in doubt.