Easy Bunny Cake Recipe- Cute & Delicious Dessert
Easy Bunny Cake Recipe delights everyone, especially when spring is in the air or Easter is just around the corner! This isn’t just any cake; it’s a fluffy, sweet masterpiece that brings smiles to faces of all ages. What makes this particular Easy Bunny Cake Recipe so special? For starters, it’s incredibly straightforward to make, meaning even if you’re a begin extractner baker, you can create something truly impressive. We love it because it’s versatile – perfect for a festive occasion or just a fun weekend baking project with the kids. The charm lies in its adorable presentation, transforming a simple cake into a whimsical bunny that’s almost too cute to eat. Get ready to hop into some baking fun!
Easy Bunny Cake Recipe
Spring is in the air, and what better way to celebrate than with a delightful and adorable bunny cake! This recipe is designed for simplicity, perfect for bakers of all levels, even those who consider themselves kitchen novices. We’re going to transform two simple cake layers into a whimsical Easter centerpiece that will charm everyone at your table. Forget complicated sculpting or intricate fondant work; this bunny is all about fun and flavor. Get ready to create a treat that’s as enjoyable to make as it is to devour.
Ingredients:
Baking Your Cake Layers
First things first, we need our canvas! Bake your two round cake layers. Whether you’re using a convenient cake mix or your cherished homemade recipe, follow the instructions precisely. Ensure your cake layers are completely cooled before you even think about frosting. This is a critical step to prevent your frosting from melting into a gooey mess. Once cooled, you can place them on a wire rack to ensure no residual heat remains. If you’re making your cakes a day in advance, wrap them tightly in plastic wrap once completely cool and store them at room temperature. This makes the assembly process much smoother.
Assembling Your Bunny
This is where the magic starts to happen!
Prepare your cake layers for assembly. Place one cooled cake layer on your serving platter or cake board. If the top of your cake layer is quite domed, you might want to carefully slice off the very top to create a flat surface. This makes it easier to stack the layers evenly. Spread a generous layer of white frosting over the top of this first cake layer. Then, carefully place the second cake layer on top, aligning the edges as best as you can. Again, if this top layer is domed, you can level it for a neater appearance.
Crum extractb coat your bunny. Now, it’s time for the “crum extractb coat” – a thin, initial layer of frosting that traps any loose crum extractbs and creates a smooth base for your final frosting layer. Apply a thin, even layer of white frosting all over the top and sides of your stacked cake. Don’t worry too much about making it perfect at this stage; the goal is just to cover all the cake. Once you’ve applied the crum extractb coat, place the cake in the refrigerator for at least 15-20 minutes. This chilling step allows the crum extractb coat to firm up, making it much easier to apply the final, beautiful layer of frosting without disturbing any crum extractbs.
Frost your bunny. Once the crum extractb coat is chilled and firm, it’s time for the main event – the final frosting! Take your cake out of the refrigerator and generously apply the rest of your white frosting. Use an offset spatula or a regular butter knife to spread the frosting smoothly over the entire cake. Aim for an even, fluffy appearance. You can create some subtle texture by swirling your spatula if you like, but a smooth finish is also lovely. This white frosting will be the main color of your bunny’s fur.
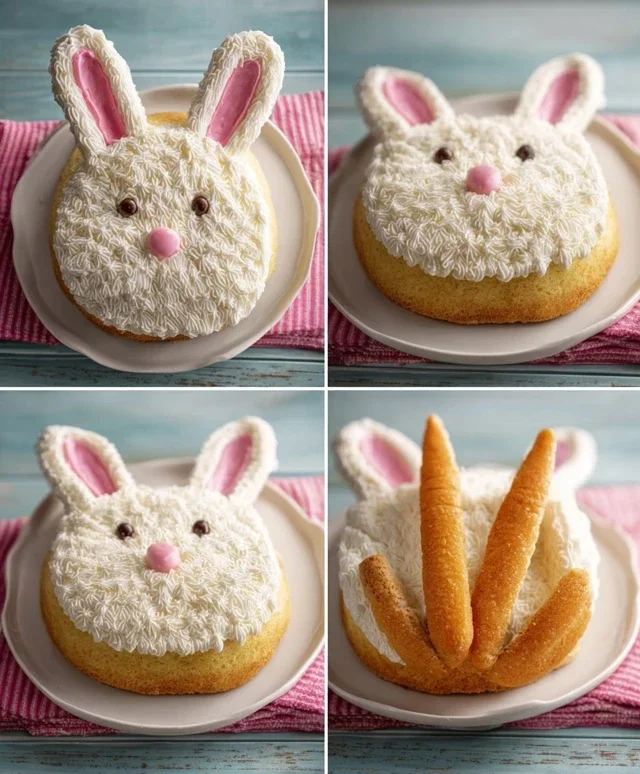
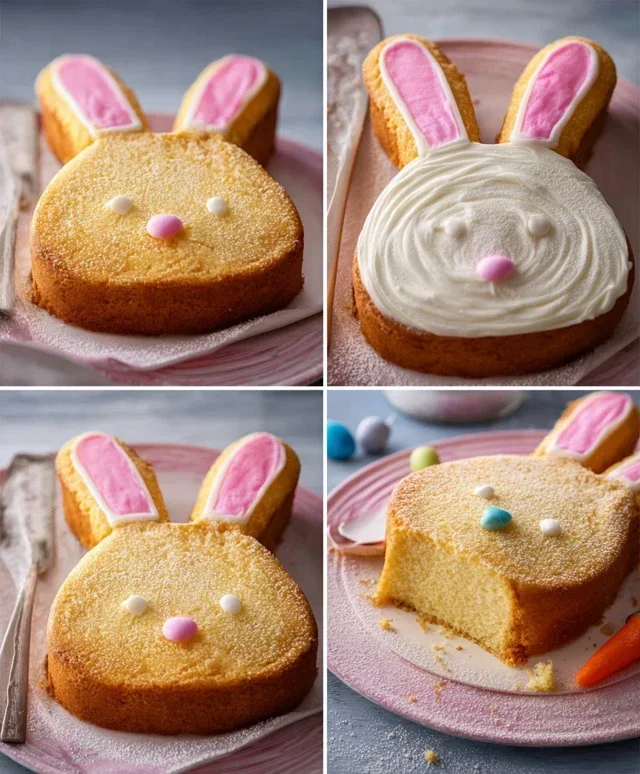
Create the bunny’s ears. For the bunny ears, we’ll use the same cake layers but shape them differently. Take your two round cake layers and cut each one in half. You’ll be using four half-circles for the ears. Position two half-circles together to form a more pointed ear shape, and then gently press the cut edges together. Place these ear shapes onto your serving platter, slightly apart, so that you know where they will attach to the cake. Now, carefully frost these ear shapes with the white frosting. You can use your piping bag with a round tip to create a slightly more defined edge for the ears, or simply spread the frosting with a small spatula. Once frosted, place them back onto the serving platter.
Assemble and decorate your bunny. Now it’s time to bring our bunny to life! Place your frosted cake body onto the serving platter, positioning it slightly behind where you placed the ears. You can gently push the frosted ears into the side of the cake body to secure them. Now, take your pink frosting. Using a piping bag with a small round tip (or a Ziploc bag with a tiny corner snipped), pipe two oval-shaped inner ears onto the white frosted ears. These pink areas will give your bunny ears depth and color. Next, use your chocolate icing or melted chocolate to draw on the bunny’s eyes, a little nose, and a mouth. For the eyes, two simple dots or small ovals work perfectly. For the nose, a small triangle or heart shape is adorable. A gentle curved line will create a sweet mouth. Finally, scatter jellybeans or colorful round candies around the base of the cake as a festive decoration, or even place a few in a little pile in front of your bunny.
And there you have it! Your very own Easy Bunny Cake, ready to hop into your Easter celebrations. This cake is a fantastic project to do with children, and the results are always met with delighted squeals. Enjoy the process, and most importantly, enjoy the delicious outcome!
Conclusion:
And there you have it – your very own delightful and easy bunny cake recipe! This recipe truly shines because it’s incredibly forgiving, making it perfect for bakers of all skill levels, from begin extractners to seasoned pros looking for a quick and charming treat. The simplicity of the steps means less time stressing in the kitchen and more time enjoying the creative process of decorating our adorable bunny. It’s the perfect centerpiece for any spring gathering, Easter celebration, or simply a fun way to brighten up an ordinary day.
For serving, this bunny cake is wonderful on its own, allowing its sweet flavor and cute design to be the star. However, you could also pair it with a fresh fruit salad, a dollop of whipped cream, or a scoop of vanilla ice cream for an extra touch of indulgence. Thinking about variations? Feel free to experiment with different cake flavors like lemon or carrot cake for a twist. You can also get creative with the frosting colors – a soft pink or lavender can be just as charming! I highly encourage you to give this recipe a try; you’ll be amazed at how simple it is to create something so memorable and delicious.
Frequently Asked Questions:
Can I make this cake ahead of time?
Absolutely! You can bake the cake layers a day in advance and store them at room temperature, tightly wrapped in plastic wrap, once completely cooled. Frosting and decorating should ideally be done closer to serving time to keep everything fresh and vibrant.
What if I don’t have a bunny-shaped cake pan?
No problem at all! You can use a standard round or rectangular cake pan and cut out a bunny shape freehand. Alternatively, you could bake two round cakes, one slightly larger than the other, and use them as the body and head, then cut out ears and a tail from extra cake scraps. Frosting and clever decorating will disguise any shape imperfections!
How can I make the frosting more festive?
Adding food coloring is an easy way to customize your frosting. Pastel colors like pink, yellow, or blue are perfect for spring. You can also use edible glitter, sprinkles, or even small candies to add extra detail and flair to your bunny’s ears, eyes, and nose.
Easy Bunny Cake Recipe
A simple and adorable bunny cake perfect for Easter or any spring celebration, made with easy-to-find ingredients and minimal fuss.
Ingredients
-
Two round cake layers (use one cake mix or your favorite homemade recipe)
-
White frosting (ready-made or your favorite homemade recipe)
-
Pink frosting (strawberry is commonly available ready-made and comes pink)
-
Chocolate icing or melted chocolate for details
-
Jellybeans or colorful round candies
-
Piping bags
Instructions
-
Step 1
Bake your two round cake layers according to your chosen recipe or cake mix instructions. Let them cool completely. -
Step 2
Place one cake layer on your serving platter. Spread a generous layer of white frosting over the top. -
Step 3
Carefully place the second cake layer on top of the first. Frost the entire cake with white frosting, creating a smooth bunny body. Leave the top surface slightly rounded. -
Step 4
Use piping bags to create the bunny’s face. Outline two ear shapes on top of the cake, leaving space between them. Then, pipe two eye shapes and a nose shape on the front of the cake body. -
Step 5
Fill in the ear shapes with pink frosting using a piping bag. Use chocolate icing or melted chocolate to fill in the eye and nose details. -
Step 6
Decorate the bunny’s face and body with jellybeans or colorful round candies for accents and festive touches.
Important Information
Nutrition Facts (Per Serving)
It is important to consider this information as approximate and not to use it as definitive health advice.
Allergy Information
Please check ingredients for potential allergens and consult a health professional if in doubt.