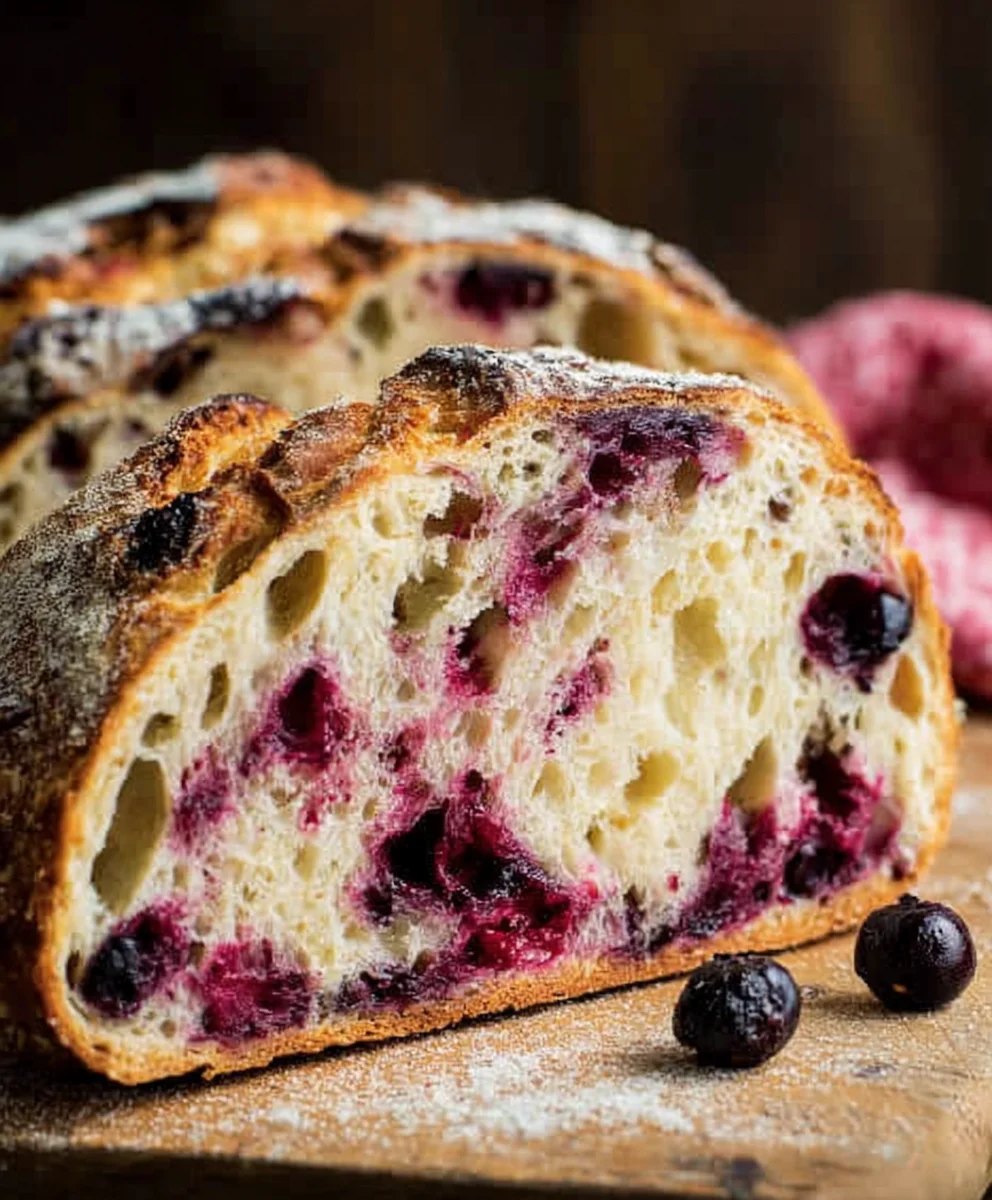
Blueberry Lemon Sourdough Bread-Tangy Sweet Loaf
Blueberry Lemon Sourdough Bread. Oh, the glorious aroma that wafts through the kitchen as this beauty bakes is simply non-intoxicating! There’s something inherently comforting and deeply satisfying about a perfectly baked loaf of sourdough, and when you combine it with the bright, zesty punch of lemon and the sweet bursts of juicy blueberries, you’ve truly created a masterpiece. This isn’t just any bread; it’s an experience. People flock to this particular combination because it strikes that perfect balance between tangy sourdough complexity and vibrant, fruity sweetness. What makes our Blueberry Lemon Sourdough Bread truly special is the way the tartness of the lemon zest cuts through the richness of the fermented dough, while the plump blueberries add pockets of delightful moisture and natural sweetness. It’s the ultimate breakfast treat, a fantastic accompaniment to afternoon tea, or even a surprising addition to a cheese board. Get ready to elevate your baking game with this irresistible recipe!
Ingredients:
- 3 cups bread flour
- 1⅓ cups lukewarm water
- ¾ cup active, bubbly, and well-fed sourdough starter
- 3 tablespoons white sugar
- 1 teaspoon salt
- 1¼ cup fresh blueberries
- 1 tablespoon lemon zest
The Dough: Mixing and Developing
Autolyse (Optional but Recommended)
To start this delightful Blueberry Lemon Sourdough Bread, I recommend a brief autolyse period. This step involves mixing just the flour and water and letting it rest. It helps hydrate the flour evenly, making the dough more extensible and easier to work with later. In a large mixing bowl, combine the 3 cups of bread flour and 1⅓ cups of lukewarm water. Mix with your hands or a spatula until just combined and no dry pockets of flour remain. It will look shaggy and not smooth. Cover the bowl with a damp tea towel or plastic wrap and let it rest for 30 minutes to an hour at room temperature. This resting period is crucial for gluten development without kneading.
Incorporating the Starter and Other Ingredients
After the autolyse, add your ¾ cup of active, bubbly sourdough starter to the bowl. Gently dimple it into the dough with wet fingers. Next, sprinkle the 3 tablespoons of white sugar and 1 teaspoon of salt over the dough. Now, it’s time to really bring everything together. Using wet hands, start to pinch, fold, and squish the ingredients into the dough. Continue this process for about 5-10 minutes until the starter, sugar, and salt are fully incorporated and the dough begin extracts to feel a bit more cohesive. It will still be quite sticky, and that’s perfectly normal for a sourdough enriched with sugar.
Bulk Fermentation: The Heart of Sourdough
Stretch and Folds
Once your dough is mixed, it’s time for bulk fermentation, where the magic of sourdough happens. This is the primary fermentation period where the dough develops strength and flavor. We’ll perform a series of “stretch and folds” to build structure. For the first set of stretch and folds, wet your hands slightly to prevent sticking. Reach under one side of the dough, gently stretch it upwards, and fold it over the rest of the dough. Rotate the bowl 90 degrees and repeat this stretch and fold action three more times, essentially folding the dough in on itself from all four directions.
After this first set, cover the bowl and let the dough rest for 30 minutes. You’ll repeat this stretch and fold process 3-4 more times over the next 2-3 hours, with 30-minute rests in between each set. With each set of folds, you’ll notice the dough becoming smoother, more elastic, and stronger. It will start to hold its shape better and feel less sticky. During this time, the wild yeasts in your sourdough starter are busy creating gas, which will cause the dough to rise and become airy.
Adding the Flavor Enhancers
Around the second or third set of stretch and folds, it’s time to introduce our delicious flavorings. Gently scatter the 1 tablespoon of lemon zest evenly over the surface of the dough. Then, add the 1¼ cup of fresh blueberries. Now, be delicate. Instead of aggressive stretching, try to gently incorporate the blueberries and lemon zest into the dough using a folding motion. You want to distribute them as evenly as possible without deflating the dough too much or bursting all the blueberries at this stage. They will continue to distribute during the remaining folds and proofing.
Shaping and Final Proof
Pre-Shaping and Bench Rest
Once bulk fermentation is complete (the dough should have increased in volume by about 50-75% and look visibly aerated with some bubbles on the surface), it’s time to shape the bread. Gently tip the dough out onto a lightly floured surface. You can lightly flour your hands as well. Perform a gentle pre-shape by gathering the edges of the dough towards the center, creating a loose round or oblong shape. Let the dough rest, covered with a damp tea towel, for 20-30 minutes. This bench rest allows the gluten to relax, making the final shaping much easier.
Final Shaping and Cold Proof
After the bench rest, it’s time for the final shape. If you’re aiming for a round loaf (boule), gently cup your hands around the dough and create tension by pulling it towards you in a circular motion. If you prefer an oblong loaf (batard), shape it accordingly. Carefully transfer the shaped dough, seam-side down, into a well-floured banneton (proofing basket) or a bowl lined with a floured tea towel. Cover the banneton tightly with plastic wrap or place it inside a plastic bag. Refrigerate the dough for at least 12 hours, or up to 24 hours. This cold proofing period develops more complex flavors and makes the dough easier to score.
Baking the Blueberry Lemon Sourdough Bread
Preheating and Scoring
When you’re ready to bake, preheat your oven to 450°F (230°C) with your Dutch oven inside for at least 30 minutes. This ensures a very hot baking vessel for maximum oven spring. Carefully remove the hot Dutch oven from the oven and take off the lid. Gently invert your cold dough from the banneton onto a piece of parchment paper, or directly into the hot Dutch oven if you’re comfortable. Using a sharp knife or a lame (scoring tool), quickly score the top of the dough. A simple cross or a few diagonal slashes work well. Scoring allows the bread to expand evenly in the oven.
The Bake
Carefully place the lid back on the Dutch oven and place it back into the preheated oven. Bake for 20 minutes with the lid on. This traps steam, which is essential for a good crust and oven spring. After 20 minutes, carefully remove the lid. The bread will have risen significantly and started to turn a pnon-alcoholic ale golden color. Reduce the oven temperature to 425°F (220°C) and continue to bake for another 20-30 minutes, or until the crust is a deep golden brown and the internal temperature of the bread reaches around 205-210°F (96-99°C).
Cooling
Once baked, carefully remove the loaf from the Dutch oven and place it on a wire rack to cool completely. This is perhaps the hardest part, but resist the urge to slice into it immediately! Allowing the bread to cool fully ensures the crum extractb is set and not gummy. The aroma of blueberries and lemon will fill your kitchen, a testament to the wonderful Blueberry Lemon Sourdough Bread you’ve created. Enjoy the tangy, fruity, and slightly sweet goodness!

Conclusion:
We’ve reached the end of our delicious journey crafting the perfect Blueberry Lemon Sourdough Bread! This recipe, with its delightful tang from the sourdough starter, bursts of fresh blueberries, and zesty lemon undertones, is sure to become a favorite. Its slightly crisp crust and soft, airy interior make it incredibly versatile. Whether you enjoy it toasted with a smear of butter, as a base for avocado toast, or simply on its own, this bread offers a truly satisfying experience. I encourage you to give this recipe a try and discover the joy of homemade sourdough, especially when infused with such vibrant flavors!
Frequently Asked Questions:
Can I use frozen blueberries instead of fresh?
Yes, absolutely! If using frozen blueberries, it’s best to toss them with a tablespoon of the flour from the recipe before adding them to the dough. This helps prevent them from bleeding too much color and making the dough too wet. You might also need to adjust baking time slightly, as frozen fruit can release more moisture.
What if I don’t have a sourdough starter?
While this recipe is designed for sourdough, you could adapt it into a quick bread by using baking powder and baking soda as leavening agents. However, you would miss out on the signature tangy flavor and chewy texture characteristic of true sourdough. Building and maintaining a sourdough starter is a rewarding process, and I highly recommend it for future baking endeavors!
How can I store leftover Blueberry Lemon Sourdough Bread?
Once cooled completely, store your Blueberry Lemon Sourdough Bread at room temperature in a bread box or a paper bag for up to 2-3 days. For longer storage, you can slice the bread and freeze it. Thaw slices at room temperature or toast them directly from frozen.
Blueberry Lemon Sourdough Bread-Tangy Sweet Loaf
A delightful sourdough bread bursting with the tangy sweetness of blueberries and bright lemon zest, perfect for any occasion.
Ingredients
-
3 cups bread flour
-
1⅓ cups lukewarm water
-
¾ cup active, bubbly, and well-fed sourdough starter
-
3 tablespoons white sugar
-
1 teaspoon salt
-
1¼ cup fresh blueberries
-
1 tablespoon lemon zest
Instructions
-
Step 1
Optional Autolyse: Mix flour and water until just combined. Let rest for 30-60 minutes. -
Step 2
Incorporate Starter & Other Ingredients: Add sourdough starter, sugar, and salt. Pinch, fold, and squish for 5-10 minutes until cohesive and sticky. -
Step 3
Bulk Fermentation & Stretch/Folds: Perform 3-4 sets of stretch and folds every 30 minutes for 2-3 hours. Add blueberries and lemon zest around the second or third set, incorporating gently. -
Step 4
Shaping: Gently tip dough onto a floured surface. Pre-shape into a round or oblong. Rest for 20-30 minutes. Then, perform final shaping, creating surface tension. -
Step 5
Cold Proof: Place shaped dough seam-side down into a floured banneton or lined bowl. Cover and refrigerate for 12-24 hours. -
Step 6
Baking: Preheat oven to 450°F (230°C) with a Dutch oven. Score the dough and bake covered for 20 minutes, then uncovered at 425°F (220°C) for another 20-30 minutes until deep golden brown. -
Step 7
Cooling: Remove from Dutch oven and cool completely on a wire rack before slicing.
Important Information
Nutrition Facts (Per Serving)
It is important to consider this information as approximate and not to use it as definitive health advice.
Allergy Information
Please check ingredients for potential allergens and consult a health professional if in doubt.